Table of Contents
When it comes to optimizing the sound and performance of an electric guitar, the height of the pickups is a crucial yet often overlooked element.
The distance between the pickups and the strings—known as pickup height—can significantly influence your guitar’s tone, volume, and responsiveness.
This Killer Rig article aims to provide a comprehensive guide on the subject, covering everything from the technical factors that affect pickup height to the step-by-step process of making adjustments.
Whether you’re looking to enhance your guitar’s clarity, volume, or tonal color, understanding the nuances of pickup height can be a game-changer.
What is Guitar Pickup Height?
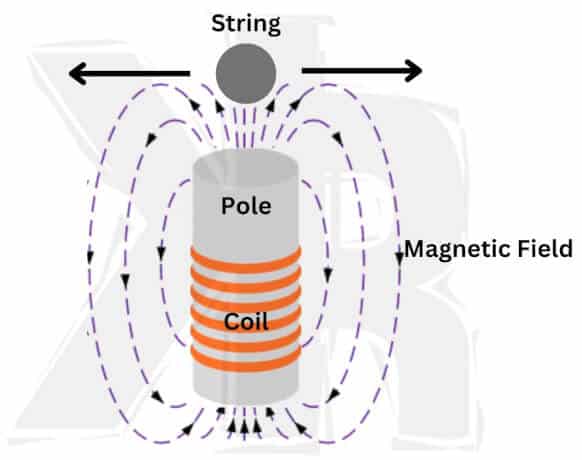
Pickup height refers to the distance between the surface of a guitar’s pickups and the underside of the strings.
In electric guitars, pickups are electromagnetic devices that capture the vibrations of the strings and convert them into an electrical signal, which is then amplified.
The height of these pickups is not arbitrary; it plays a pivotal role in determining the strength and quality of the signal that gets transmitted.
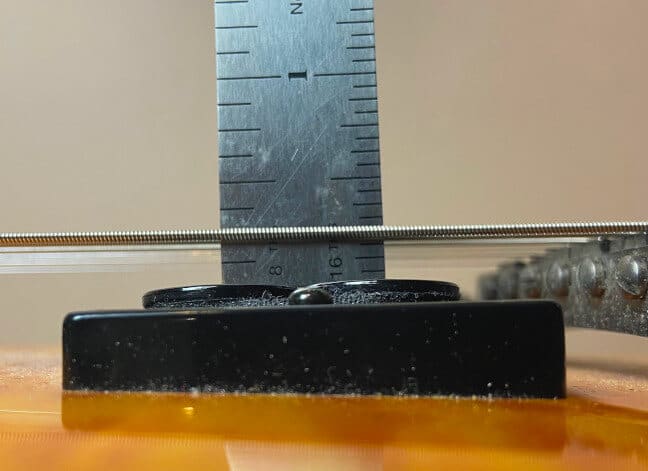
The height is usually measured in millimeters or inches and can be adjusted by turning screws located at the corners or sides of the pickup.
These adjustments can either bring the pickup closer to the strings for a stronger, more immediate sound or move it further away for a softer, more nuanced tone.
Understanding pickup height is essential for any guitarist looking to get the most out of their instrument, as it directly impacts the guitar’s tonal characteristics and overall performance.
Why Pickup Height Matters
The importance of pickup height in an electric guitar setup cannot be overstated. It’s a critical factor that influences several aspects of your guitar’s sound and playability. Here’s why it matters:
Tone Quality
- Clarity and Definition: A properly adjusted pickup height can bring out the best in your guitar’s tonal quality, offering clear note definition and balanced string-to-string output.
- Dynamic Range: The height affects how much of the string’s vibration is captured. Closer pickups can offer a more dynamic range, capturing subtle nuances in your playing.
Volume and Output
- Signal Strength: Pickups closer to the strings will produce a stronger electrical signal, resulting in higher volume and output. Conversely, lowering the pickups will reduce the signal strength.
- Feedback Control: The distance between the pickups and strings can also influence the amount of feedback and noise you get, especially at higher volumes.
Responsiveness
- Attack and Sustain: The pickup height can affect the initial attack and sustain of the notes you play. Closer pickups may offer a quicker attack but can sometimes reduce sustain due to magnetic pull on the strings.
- Playing Style Adaptability: Whether you’re a fingerstyle player or a heavy strummer, adjusting the pickup height can help tailor the guitar’s responsiveness to your playing style.
Further Learning: How guitar pickups work.
Factory Pickup Height Settings
These setting are the recommended starting point for adjusting pickups. They provide a good balance between tone, output, and playability. They are great for guitars like the Stratocaster, Telecaster, and humbucker equipped models like the Les Paul:
| Pickup Type | Thick String | Thin String | Position |
|---|---|---|---|
| Humbucker | 3/32″ | 1/16″ | All |
| Single-Coil | 3/32″ | 1/16″ | Bridge |
| Single-Coil | 1/8″ | 3/32″ | Neck, Middle |
| P90 | 1/16″ | 1/16″ | Neck, Bridge |
The measurements in the table above are just an example. The actual measurements may vary depending on the pickups and the guitar.
Also, it’s important to keep in mind that these measurements are just a rough idea of where to start. Pickups may have different factory heights depending on the guitar.
It’s a good idea to consult the manufacturer’s specifications for your pickups before making any adjustments.
Factors to Consider When Adjusting Pickup Height
Adjusting the height of your guitar’s pickups isn’t a one-size-fits-all operation. Several factors come into play, each contributing to how your guitar will ultimately sound. Here are some key considerations:
String Gauge
- Thickness Matters: Heavier strings produce a stronger magnetic field, which can affect the pickup’s output. If you switch to a heavier gauge, you may need to adjust the pickup height to compensate.
- Balance: Lighter strings might require the pickups to be closer to achieve a balanced output across all strings.
Type of Pickup
- Single-Coil vs. Humbucker: Single-coil pickups generally require closer positioning to the strings due to their lower output. While humbuckers, with their higher output, might need to be set a bit lower.
- Magnet Type: Different pickups use different types of magnets, which can also influence the optimal height.
Playing Style
- Strumming vs. Fingerstyle: Aggressive strummers might benefit from a lower pickup height to reduce the potential for clipping and distortion, while fingerstyle players may prefer a higher setting for more sensitivity and dynamic range.
- Genre-Specific Needs: The optimal pickup height can vary depending on the genre you’re playing. Jazz players might prefer a softer, more muted tone, requiring a lower pickup height. While rock players may opt for a higher setting for more attack and sustain.
Instrument Condition
- Neck Relief and Action: The curvature of the neck and the height of the strings above the fretboard can affect the pickup height, requiring adjustments to maintain a balanced sound.
- Age of Pickups: Older pickups may have weakened magnets, which could necessitate raising the height for adequate output.
Taking these factors into account will help you make more informed decisions when adjusting your pickup height, allowing you to optimize your guitar’s performance for your specific needs.
Step-by-Step Guide to Adjusting Pickup Height
Adjusting the height of your guitar’s pickups is a relatively straightforward process, but it does require some attention to detail. Here’s a step-by-step guide to help you get it right:
Tools Needed
- Screwdriver (usually Phillips or flat-head, depending on your guitar)
- Ruler or measuring tape
- Optional: Capo for holding down strings
Preparing the Guitar
- Tune the Guitar: Ensure your guitar is in tune to maintain string tension during the adjustment.
- Clean the Area: Wipe down the pickups and surrounding area to remove any dust or debris that could interfere with the adjustment.
Measuring Current Height
- Measure: Use a ruler to measure the current distance between the bottom of each string and the top of each pickup. Note these measurements.
Making Adjustments
- Loosen or Tighten Screws: Use a screwdriver to adjust the screws at the corners of the pickup. Turning clockwise will raise the pickup, and counterclockwise will lower it.
- Check Balance: Make sure the pickup is level by measuring both sides. Some players prefer a slightly tilted pickup for tonal variation between the bass and treble strings.
- Test Sound: After making a small adjustment, plug in your guitar and test the sound. Listen for changes in volume, tone, and clarity.
Fine-Tuning
- Repeat: If necessary, go back and make additional adjustments, always testing the sound after each change.
- Compare: Once you’re satisfied, compare the new height measurements with the original ones to see how much you’ve adjusted.
Learn how to identify the pickups in your guitar!

How to Determine if a Pickup is Too Low
If you feel that your pickup doesn’t have a great output level, then there is a good chance it’s too low. This means that it’s too far away from the strings.
In this case, you will have a thinner, weaker tone. Raising it to be closer to the strings will mean a thicker, fuller sound. But also a higher output.
The result of this will also mean that your amplifier might be pushed harder. Earlier break up or less clean headroom could be the case. But it’s worth experimenting!
What If a Pickup is Too High?
If the pickup is too high, then there are many things that could be happening. First, the string might sound like it’s out of tune when you play. There might also be some string buzzing when you dig into them harder.
Performance wise, this will mean a very hot output that might be too powerful for your music style. It could also mean the sound is too bass heavy and thick. Lowering the pickup would back off the output and provide a brighter sound.
There is also what’s called Wolf tones. This is a sound that introduces harmonics that are not pleasing to the ear. It’s almost like a cloudiness around the note. This is also the result of a string being too close to the pickup.
Tips and Tricks
After making the adjustments to your pickups, it’s important to dial in your tone. This involves fine-tuning the pickups to suit your personal needs.
This is the genre of music you play, the amplifier settings, and even the string thickness. Here are some tips for dialing in your preferences:
- Play the guitar and listen closely to the sound. Take note of any areas that you feel could be improved, such as a lack of bass or treble, or any humming or buzzing sounds.
- Make small adjustments to the pickups. Such as raising or lowering them, and listening to the changes in the sound.
- Make sure to switch between the pickups and factor in level changes. If the neck and bridge are radically different, one could end up becoming a boost!
- Experiment with different amplifier settings. Adjusting the tone and volume controls to see how these changes affect the overall sound.
- Try playing in different rooms or venues to see how the room acoustics affect the sound.
- Be patient and take your time. Dialing in your preferences is a process! It could take several adjustments and experimentation before you achieve the desired sound.
It’s important to remember that everyone’s sound is different! There really is no one correct setting for the pickups. The goal is to find the setting that produces the best sound for you and your playing style.
Conclusion
If this is your first time adjusting your pickups, don’t sweat it. You won’t ruin your guitar or lose any of the tones. To return to the start, use our tape technique.
Otherwise, work at it. You will find that you can unlock sounds you might not have known were possible.
It can take a bit of time to find the setting that is just right, but it will come. Try and have some fun with it and learn what you can. As you get familiar with it, you will be making more adjustments than you thought you would need!
FAQs
How often should pickup height be adjusted?
The need to adjust pickup height varies based on your playing style, string gauge, and musical genre. Generally, once you find a setting that works for you, adjustments are infrequent.
Professional musicians may check every few months as part of regular maintenance, while casual players might only need an annual check. If you notice a significant change in sound, it’s time to reassess.
Is it ok if the pickup is angled?
If your pickup is angled when compared to the strings, that’s ok! A pickup can be slightly angled and still perform perfectly. This is because it’s the magnetic force that is actually sensing the string vibrations.
Once you have the height set right and are getting the sound you desire, then the angle is irrelevant. Some guitars have pickups that are angled by design. This means there is nothing to worry about if yours also has an angle.
Does pickup height affect sustain?
Yes, pickup height does affect sustain. If the pickup is too close to the strings, the strong magnetic field can inhibit the strings’ natural motion, thus killing the sustain.
But if it’s too far away from the strings, then the output will be lowered and so will the sustain. Because of this, experimentation is needed to find the optimal height.
Does pickup height affect buzz?
Yes, pickup height can affect buzz. If the pickup is too close to the strings, it might create buzz when you play aggressively.
This is the result of the strings actually making contact with the pickup itself. If you find this to be the case, lower the pickup until the buzz goes away.
Does raising pickups increase volume?
Raising the pickups can increase the output level, which can result in a thicker, fuller sound. This might push your amplifier harder, potentially leading to earlier break-up or less clean headroom.
However, if the pickup is too high, it can cause issues like out-of-tune sounds and string buzzing.