Table of Contents
You will hear a lot of people say that cleaning guitar pickups is important to their performance. Truth is, this simply isn’t accurate.
The dirt and grime that can build up will not affect the magnetic field enough to cause any issues. They will still work just as well covered in dirt.
The trouble is, they are not very nice to look at this way. And over time, the grime, and oils can cause rust to form on the ferrous pole pieces.
This will only make them look much worse than one would like. So, it’s important to learn how to clean guitar pickups to preserve them from rust. But also to keep them looking brilliant!
In this Killer Rig article, we break down the complete process of cleaning guitar pickups in a step-by-step manner.
Supplies Needed To Clean Guitar Pickups
All guitarists should have the necessary tools to maintain their instrument. Below are a few items that should be on hand when performing guitar maintenance. More specifically, pickups cleaning.
- Jim Dunlop Body & Fingerboard Cleaning Kit.
- Microfiber cloths.
- Small plastic multipurpose scraper kit.
- Compressed air.
- Soft bristled brush.
- Metal polish.
- Masking tape.
This procedure is best done during a routine string change. So make sure to have a new set of strings, winder and the tools needed to complete it.
Further learning: how guitar pickups work.
How to Clean Guitar Pickups Step-By-Step
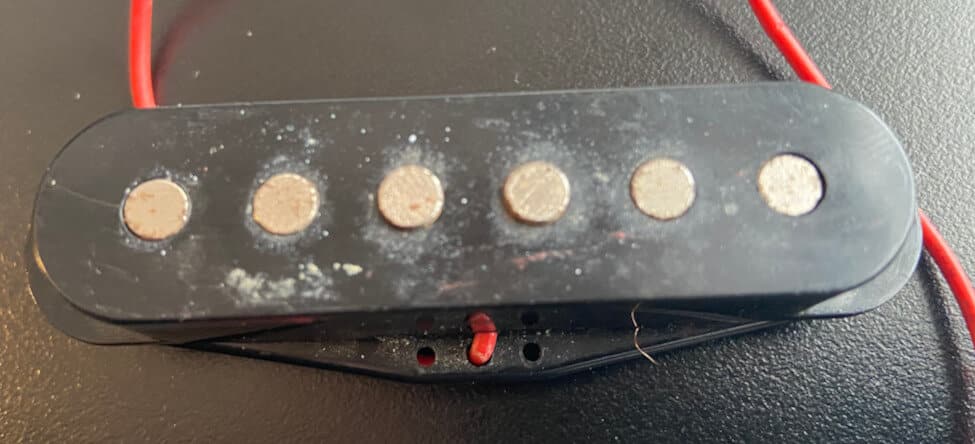
There are many different types of guitar pickups on the market. Not every guitar will be the same. You will find that the more common designs have the pole pieces exposed.
They can be seen on the top of the pickups as metal slugs. There is normally one per string on your guitar.
This guide can be used for single-coil and humbucker pickups. Both with exposed pole pieces and no metal covers. If your pickups have metal covers, see the procedure for that below.
Step 1: Remove the Guitar Strings
The first step is to remove the guitar strings. They will be in the way of a good cleaning job if left in place. This makes cleaning your pickups best done during a string change. This way you can do a thorough job.
The best and safest way to remove your strings is to loosen the tension by turning the machine heads. Some people will suggest you simply cut them. But if you do this while they are tense, it could hurt you or the finish on your guitar.
I have seen them cut with some tension left and the strings end up damaging the fretboard or body finish.
Loosen the tuners and remove all tension, then you can cut the strings. However, it’s just as easy to pull them off the guitar without cutting.
Step 2: Polish Pole Pieces (Optional)
If your metal pole pieces are looking kind of dull and tarnished, you can make them look new again! Not all pole pieces need them, but I find single coil pickups can benefit from it. This is optional, if you do not want to shine your pole pieces, carry on to step 3.
This is where a good metal polish can help. Brasso or silver polish is great for this and can also help remove light rust.
This step doesn’t need to be done every time. But it’s good to do when the pole pieces begin to look dull or even produce light rust. It’s best to use some masking tape around the pole pieces. This will help prevent the polish from making contact with the cover.
Then, apply a small dab of the polish to a cloth. Gently rub the top of the pole pieces with the polish. Do this until it’s worked into the cloth, and then wipe up any that remains.
Repeat this step until the poles are shiny and new looking. Then remove the tape and proceed to the next step.
Step 3: Clean the Pickup Body
With the strings removed, and pickup surfaces exposed, you can begin. The first place to start is to remove the surface grime and dirt.
This is best done by using the Dunlop body cleaner. It’s made to remove dirt and grime, plus polish. Many players swear by it because it is so effective.
The correct way to use it is to spray the cleaner into the supplied cloth. Do not spray it directly onto the pickups. If you do, it could get inside the pickup, and we do not want that.
By spraying it onto the cloth, you prevent it from getting inside. Use enough to dampen an area of the cloth to do its work.
Then proceed to wipe the pickup body gently. The cleaner is powerful enough to remove the dirt, but safe on the materials they are made from. Remove the dirt from the body as best you can.
Step 4: Get at Hard to Reach Areas
Once the body has been wiped clean, you may have a few areas that are harder to get at. Dirt build-up can sometimes get into the holes around the pole pieces. Wiping will not remove this grime easily.
This is where the multipurpose scraper kit will come in handy! Not only is it a scraper kit, but it has picks perfect for this task. Use them to get into the tight, hard-to-reach areas around pole pieces, etcetera.
The kit can be used to scrape off some of the more stubborn build-ups that won’t budge easily. Just be careful not to scratch any surfaces if choosing to use the scrapers for this task.
You can also make use of a toothbrush to safely remove dirt. Or any soft-bristled brush that can scrub around the poles.
Step 5: Remove Dust with Compressed Air
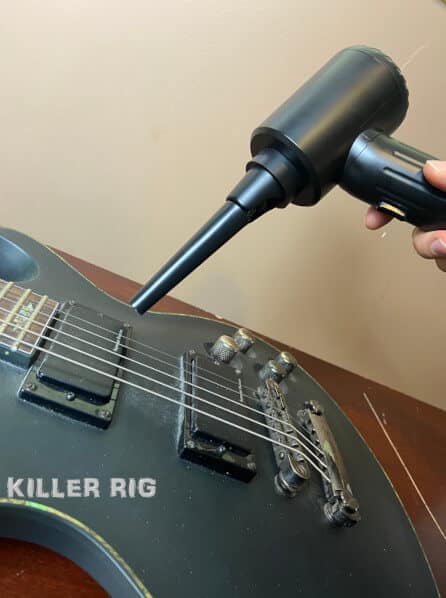
Another great way to make sure you are getting a thorough cleaning is to use some compressed air. Humbuckers especially have many crevices. Dust likes to get into them and remain there. This is a job for compressed air!
Point the canister of compressed air at some of the crevices and apply a light blast. The dust will be removed very quickly. Just make sure to use eye protection for this part. It’s hard to say what will come out!
You can even use the compressed air to try and blast the dust out of the guitar body cavities around the pickups.
You don’t need to be too worried about dust getting into the pickups as a result. The covers on single coils are quite tight. Plus, the coils are either wrapped in tape or potted anyway.
This is completely optional, of course. The dust and dirt will not affect the performance of the magnetic field that the pickup uses to operate.
Step 6: Wipe Down Surfaces
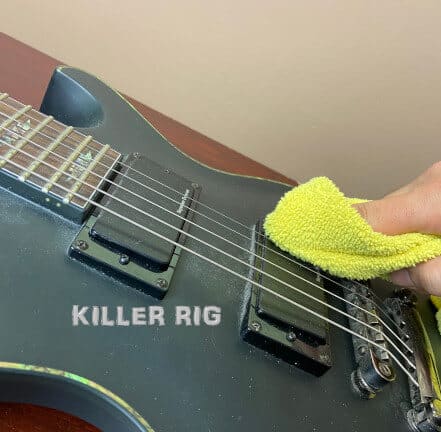
At this point, the pickups should be looking great! But if there was some dust or dirt that got onto the body, then it’s time to give it all one final wipe.
Spray some Dunlop cleaner onto a microfiber cloth. Then proceed to wipe the pickups and the surrounding area.
Make sure to clean it all well so that you will be pleased with the outcome. Once you are happy, you can consider the cleaning a success! Go ahead and take care of other maintenance tasks like cleaning your fretboard etc.
Step 7: Put on New Strings
Once you are happy and finished your electric guitar maintenance, it’s time to put on the new strings. When doing so, make sure to protect the guitar finish.
Keep it clean by working on a flat surface with room to do the job. If you are doing it on the floor or are cramped, you may transfer dirt to the freshly cleaned instrument.
Guitar Pickups With Metal Covers
If your guitar has pickups with metal covers, the process is a bit different. You don’t want to use the Dunlop body cleaner on them because it might affect the luster. Instead, you will want to shine them up with a metal polish. There are a few that work great:
- Brasso.
- Silver polish.
- Simichrome.
These are just a few examples, any good metal polish is fine. Just make sure it’s not abrasive!
Apply the Metal Polish
Once you have your rag and polish ready, follow these steps:
- Use compressed air to clean out the dust in and around the pickup. Focus on the body cavity. Make sure to protect your eyes!
- Put a small amount of metal polish on a soft rag or microfiber cloth. Then apply it to the pickup and rub it in small circles covering the entire surface.
- Using a clean part of the rag or cloth, remove the polish and any traces of it from the pickup.
- Using a pick set, get any polish that couldn’t be removed with the rag. This is areas around screw heads and slots. A toothpick can be used for this as well.
- Clean up any residue and you’re done!
The metal polish will remove any dirt or gunk from the pickups. You don’t need to worry about using a cleaner first. It will also get rid of small rust spots. If the rust is pretty bad, it might not work as great. See below for badly rusted pickups.
Is Rust Bad for Pickups?
Rust will develop on some pickups sooner than others. This depends on the environment the guitar is stored in.
As well as how often it gets cleaned of oils. But rust won’t affect the performance of your pickups. It just looks bad!
Some people don’t mind it and even think it makes the guitar look better. If this is you, then you don’t have to worry about anything. If not, then you may want to know how to get rid of it.
Do guitar pickups wear out? Click here to learn more!
How to Remove Rust from your Guitar Pickups
Rust can be a challenging thing to remove. If it’s quite bad, then you might be out of luck.
If that’s the case, then you can simply replace pickups or covers. But there are a few things you can try to remove it.
- Scrape it off with a knife or flathead screwdriver. This will normally remove surface rust quite easily. Just make sure to not damage the other parts.
- Use vinegar and apply a small amount to the area that is rusted. Do this with a cloth dampened by vinegar. Then lightly dab it onto the area. Continue to apply it if it dries. Let it sit for 30 minutes and clean it off.
- Create a paste from baking soda and water and apply it to the rust. Let it sit for an hour or more and clean it off. Then try and scrape away any remaining rust.
- Use an automotive rust removal compound. Just be extra careful to not scuff any of the other surfaces. And don’t let any moisture enter the pickup coils.
- If the rust isn’t too bad, you can also use a pencil eraser. You read that right! The friction of rubber against the rust will rub it off. Give it a try!
These are methods that have all been effective. Select the one that you feel most comfortable with and remove your rust!
Have you ever considered if guitar pickups can be painted?
Regular Routines
Cleaning your guitar pickups is a great way to keep them looking nice and prevent rust. A regular maintenance routine should be done to your guitar anyway. Every time you change the strings, make it a habit to clean them at the very least.
Some great preventive measures are to wash your hands before you play. This will prevent oils from transferring to the guitar. You might also want to wipe the strings down weekly.
Don’t be afraid to wipe the body and pickups with a microfiber towel on occasion. It can help remove the bulk of dust and oils.
Make sure to also keep the electric guitar stored in the right environment. By taking extra precautions, you can prevent rust from forming. In the end, this will ensure your guitar is in perfectly playable condition for years to come!