Table of Contents
If you play an electric guitar with a tremolo bridge, you know how difficult it can be to stay in tune at times. Using the whammy bar just makes the experience even worse. This is something that is uninspiring, demotivating, and even disastrous. Especially when you are playing before a live audience.
It would seem that you need a professional’s help to fix it, but what if you could do it on your own with the right tools? You would be playing confidently before your audience again in no time.
It might look intimidating and very technical. But the tremolo system is actually easy to grasp. And once you know the basics of the design, you can set your tremolo spring tension easily enough.
What You Need To Know About Tremolo Spring Tension
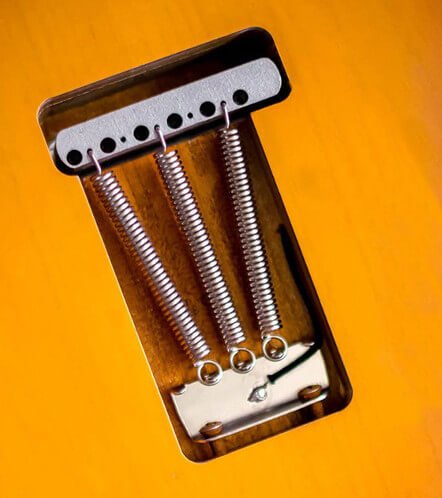
The first thing that you need to identify and understand is the tremolo bridge design. This is the structure on your guitar that holds your strings on the body side of the instrument.
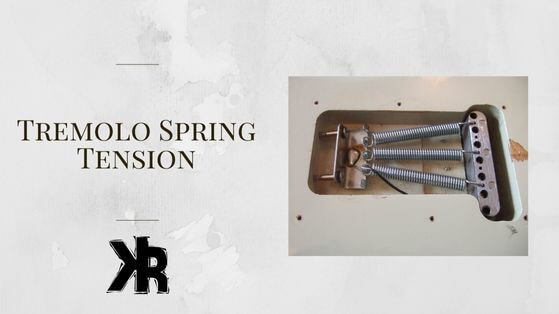
In most cases, there are also screw-type tuners and clamps to fasten your strings to the bridge. On the back side of the electric guitar body, you will find the springs.
These springs work to counterbalance the bridge. Because the string tension will want to pull it towards the neck, we need springs to offset that force. There are several variations in design, such as vibrato and tremolo-style bridges. Some modern and more classic designs include:
- Vintage style six screw tremolo bridge
- PRS-style floating bridge
- Modern 2-point Fender style
- Floyd Rose style tremolo
Recognizing the bridge you are about to adjust is helpful. But the science behind the tremolo is identical among most designs.
The effect produced by a floating bridge is called vibrato. This is something that we will be referring to throughout the article.
We have a guide on how to set guitar action here!
Tools That Are Needed
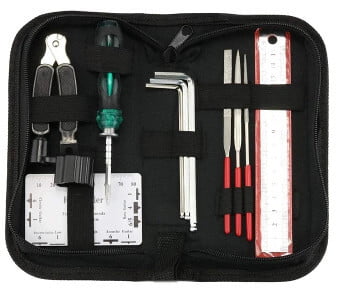
To help you set up your tremolo spring tension, you will need some basic tools. Some of them will be used to tune the system, while others to open up the guitar. We will need to access the springs from the bottom side of the electric guitar body.
- Work Mat
- Guitar Neck Rest
- Guitar tuner
- Screwdrivers
- New guitar strings
- Wire cutters
- String winder
- Teflon Lubricant
- Brasso
- Allen keys
- Radius measurement tools
While you don’t need the guitar work mat or neck rest, they are tools that help a great deal with maintenance. They have come in handy so many times that they are an investment worth making.
The process of setting up your vibrato system is best done when it is time for new strings. We want to be able to inspect the system to make sure all parts are in good shape.

Inspecting The Vibrato System
Once you have removed your old strings and guitar cavity covers, it is time to inspect the system. We are looking for worn-out parts or areas of the system that might be causing binding or friction. When it comes to a proper working vibrato, friction is the primary reason for issues, especially tremolo noise.
You will need to remove the springs from the back of the bridge at this point as well. Once the springs have been removed, put the whammy bar on and move it forward and backward. You want to see if the motion is easy and verify that there is no friction or binding.
If there is, you will need to inspect the area around the bridge to see if something is rubbing. It can also be the knife edges that are worn out, which might be binding or clicking. If you find damage, a replacement bridge may be needed.
Read my article on 2 vs 6-point tremolo bridges.
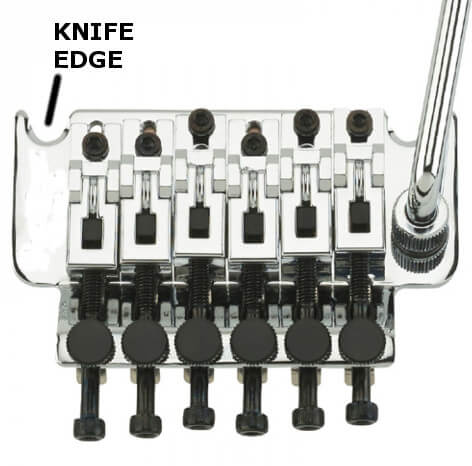
Tremolo Bridge Knife Edges
The knife edges are the part of the bridge that pivots on two studs or screws, mounted to the electric guitar body. These are the only two points that should make contact with the body. Sometimes these knife edges will wear out, causing friction to develop.
This is when tuning issues can develop, so we need to make sure to inspect and lubricate these edges.
Once you have verified that the edges are OK, you will want to use some Teflon Lubricant on them. This will ensure that they will not cause friction or wear out as quickly. It is a very easy way to maintain your knife edges. Do not use WD-40 unless you want a huge mess.
Lubricating The Knife Edges
Before you do anything, clean the bridge of all dirt, grime, or build-up that may have developed. Brasso can be helpful here to shine it up!
To lubricate them, we will not need to remove the bridge from the studs. Turn your studs 180 degrees, put some lubricant on the opposite side of the knife edges and turn them back. This will get the lube right onto the mating surface of the stud and knife edge.
Some studs will need an Allen key, and some will require a screwdriver. You should use a tool and not your fingers because you want to make sure to put it back to its original setting.
So make sure that when you turn the stud to apply the lube, it goes back the opposite way to keep the adjustment the same.
Turn the stud 180 degrees clockwise, then return it to the same position once there is lube applied.
Tremolo Spring Setup
Now that the system is checked and lubricated, it is time to clean your guitar throughout. While at this point it is also a good idea to check your nut for wear.
Once everything is clean and looks good, it’s time to put the new strings on your electric guitar. Just make sure you have the right set. If you decide to change to a smaller set, for example, you will also need to balance the tremolo system again.
Begin by first putting your springs back onto the rear side of the tremolo bridge. Then put on your guitar strings.
Once the new strings are on your guitar, proceed to tune them. As you do, the strings will fluctuate quite a bit until the spring tension is adequate. So it will take a little while to obtain proper tension.
You may also notice that once in tune, the bridge may be at a drastic angle. This may happen if you’re changing string thickness. Or have altered your spring tension.
Balancing The Vibrato
Before we proceed to make any other adjustments, we need to balance the bridge. If it is angled too far in either direction, we cannot set the string height accordingly.
With your guitar now in tune, if the back of your bridge is angled up, you need to add spring tension. To do this, you will have to tighten the two large screws on the bracket. This is the part that your springs mount to inside the vibrato cavity.
When you tighten them, only turn them a quarter turn at a time. This is because you will be adding tension to your strings at the same time. This will require you to then tune them again. When you do, you will find that they are tighter after the adjustment.
Once you loosen them, the bridge will have relaxed a bit more, which can make a large change. If the back of the bridge is sunken into the body, then you will need to loosen the springs and tighten your strings.
This all depends on whether you changed the string size or if the guitar was badly out of calibration. Do this until the bridge is parallel to the body of the guitar.
String Radius Tool
Radius tools can be used now to set the saddle height to match that of the fretboard. This is not a mandatory step, but you do want to verify that your strings are set to the same radius as your fretboard. If this setting is not correct, it will negatively affect how the guitar plays.
To adjust, turn the screws to lower or raise each saddle. You will find that some saddles have 2 screws that will need to be adjusted depending on your bridge design. Make sure you are using radius tools for these adjustments.
If you were never unhappy with how the strings played on the fretboard, you are probably OK to skip this step.
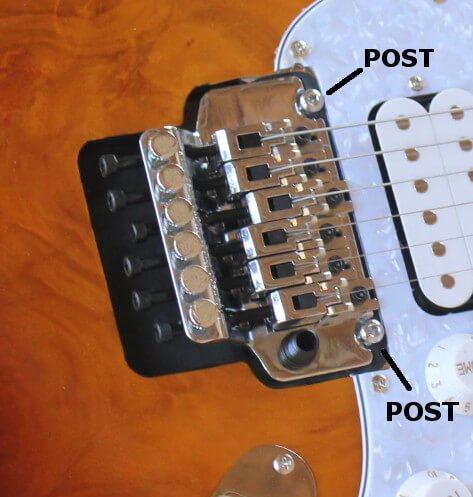
Setting The Height
The string height can also be adjusted at this point. This can be accomplished by turning the two posts that make contact with the knife edges.
This adjustment and setting of the radius may need to be done together. In most cases, it will be fine. But if the bridge is incredibly out of calibration or has been replaced, keep this in mind.
When you proceed to set the radius, you may need to adjust the string height. If you did not experience any buzz or discomfort when playing, this is not necessary.
Setting The Intonation
Once you have your string height and radius set, it’s time to check your intonation. If it’s out of adjustment, then your note pitch might be wrong at certain frets.
To verify this, play an open harmonic at the 12th fret on a string. Now play the 12th fret to see if the note is exactly an octave higher than the open harmonic. You can also use a tuner for this if you don’t quite trust your ear.
If the sound is sharp when fretted, you need to move the string saddle backward or away from the neck. If the sound was flat, move it forward or towards the neck.
Taking Out All Discrepancies
When you have made these adjustments, you may find that your bridge is not balanced again. This can be because the strings are breaking in and stretching. Or because the adjustments affected the balance.
You can make a small change to the springs to correct this without affecting any other settings. It should be a very small change anyway.
Tuning The Vibrato
As your strings break in, you may need to make some small adjustments. This will mainly be spring adjustments if all other settings were made correctly.
If you find the height is not quite right, you can adjust the two posts to raise or lower the bridge. Or maybe the radius is not quite right. It’s easy to fix with the right tools and some small screw adjustments.
You will find that as you play the guitar, you may need to make some small adjustments to dial it into where you like. This may take some practice to get right. But once you master this, your playing experience will change for the better.
Conclusion
This is a complicated process for sure, a lot of things can go wrong, but it is only an adjustment at the end of the day. If it doesn’t make sense to you or is too complicated, you can always seek professional guidance.
If you play the guitar, being able to perform proper maintenance is a benefit. Not all players are the same. We all like things a bit different, and being able to obtain that will take some practice. But once you’re there, the guitars will never play better!
FAQs
Below you will find some of the more common questions about tremolo systems.
What are the springs in the back of an electric guitar?
If you own an electric guitar that is equipped with a vibrato system, you may have noticed springs on the back. Because the guitar strings apply great tension to the bridge. The springs are installed to apply a constant counterbalance force. Without these springs, your vibrato system could not work. The strings would pull the bridge up too high to play them.
But thanks to these springs, the right amount of force is applied. This keeps your bridge in the perfect position to play the strings comfortably.
How many tremolo springs should I use?
This is determined by the string set and the key you plan to tune your guitar to. The heavier the set is, the more springs you will need because the string tension will be greater. If you use a heavier set but are tuning quite low, then you won’t need as many springs.
For a smaller set of strings, you will need less of them, as the tension will be low when trying to tune to a specific key.
3 springs are usually the average with a regular set of 9’s. If you decide to go to a string set of .011 then you may require 4 or 5. Experimentation is key here.
How tight should tremolo spring be?
Even if you were to stretch the spring to their max, this would still be OK. What you are trying to do here is balance your bridge. If you tighten your spring mount screws all the way to the body, and you still cannot balance, add more.
You are primarily trying to balance the bridge, the tension on the springs is irrelevant. They will not be damaged if the adjustments in your guitar are maxed.
If you find that your bridge is balanced, but your springs are stretched to the max, then you are good. This is proper tremolo spring tension.