Table of Contents
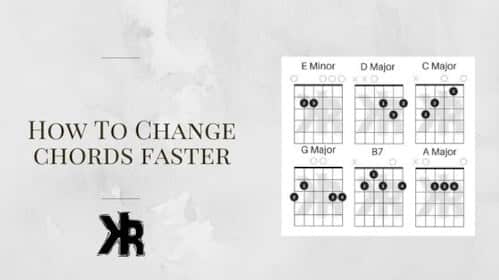
One of the first things that a new guitarist will do is learn some basic guitar chords. We all know the chords I’m talking about:
- C Major.
- D Major.
- G Major.
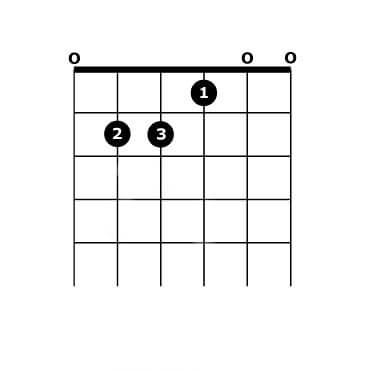
- A Major.
- A minor.
- E minor.
The idea behind learning to strum some guitar chords is part of the journey. But learning how to change chords faster requires some dedicated commitment to practice.
This gives the new guitarist some tools to play many popular rock songs. And it doesn’t need the kind of coordination associated with playing individual notes with the picking hand.
Only strumming is necessary. This allows the player to focus almost exclusively on the fretting hand. The only really hard thing is changing chords quickly enough. This requires a bit of finger independence. Especially for someone who is new to the instrument.
How To Change Chords Faster
Only time and practice will ultimately help you change chords fast. There are other things that play a part in your skill, but devotion to growth is an important focus. If you have that sorted, then let’s look at what comes next!
Finger Muscle Memory
It’s not uncommon to see beginners struggle when changing between chords. The four different kinds of musical memory have not been locked into place yet:
- The student doesn’t know where to put his/her fingers without having to think for a moment.
- The student doesn’t have the muscle memory to know what each chord shape feels like.
- The student doesn’t have the sounds of each chord in their ear yet.
- The student doesn’t know the theory behind how the chords fit together within a given key.
Many of these will come naturally with time and practice. There is one area that can be broken down and studied immediately. That is muscle memory. The biggest challenge when changing chords is moving your fingers simultaneously.
Study Chord Movements First
Start by studying where each finger needs to go when changing from one chord to another. Then work on each finger individually.
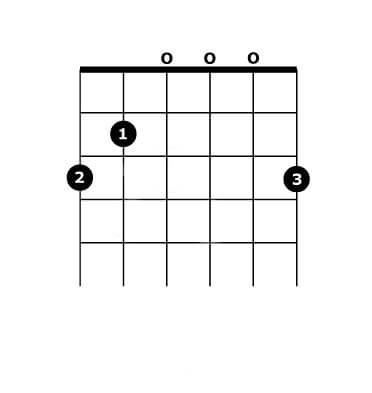
For example, let’s look at moving from G to D Major. Here’s the fingering for G Major (from the highest string to the lowest).
- The ring finger goes on the third fret of the first string.
- First finger on the second fret of the fifth string.
- Second finger on the third fret of the sixth string.
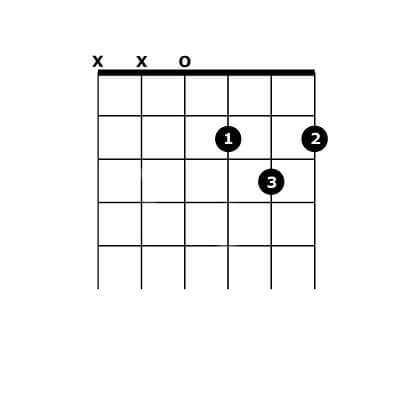
Now let’s look at the fingering for D Major:
- Middle finger on the 2nd fret of the first string (F#).
- The ring finger on the 3rd fret of the second string (D).
- First finger on the 2nd fret of the third string (A).
This is where most people stop studying. It’s a shame because this is where the greatest opportunity to improve lies. Let’s look at how each finger needs to move to get from G to D Major.
- The ring finger moves from the first string to the 3rd fret of the second.
- The first finger moves from the fifth string to the 2nd fret of the third.
- The second finger moves from the sixth string to the 2nd fret of the first.
Further reading: How many guitar chords are there?
Individual Movements Are Key
Start with moving each finger individually. These are the building blocks of changing each chord. Once you’re comfortable moving one finger, do different combinations of two.
Then, once you’re comfortable with the combinations of two fingers, try all three at the same time. You’ll find that if you do a bit of this during each practice session, your ability to change will improve.
Beginner Techniques
If you’re new, these techniques will help you get better at moving between chords. We won’t be trying to make the chords sound good yet. This will come later on. We want to get accuracy down first, or at least close.
Don’t Rush It
As a complete beginner, discipline in time management is key. Once you have a few guitar chord changes in mind that feel comfortable, now it’s time to set a pace. For the first few practice sessions, your focus needs to be on moving your fingers to the right positions.
Your goal here is to take it slow. You don’t even want to strum at this point as it will be a hindrance. You want to slowly build strength and muscle memory.
At this point you may be experiencing finger pain, so you can’t move quickly even if you wanted to. But don’t worry, this will subside with time and practice. You are going to have tightness when moving your fingers. This will affect your accuracy a great deal.
So let’s look at a helpful solution with an anchor!
Use Anchor Fingers
Using a finger or two as anchors means they stay on the fretboard between chord changes. Now, we don’t suggest making a habit of this, as it’s best to lift all fingers during changes. But this can help with muscle memory and strength building in the beginning.
You can select guitar chords that allow you to do this quite easily. We don’t suggest picking harder chords, but the ones that utilize 2 fingers are fine. You are simply trying to individualize each finger.
Simple A Minor Anchor
Some easy chords to create finger movement with anchors.
- A Minor.
- A Minor 7.

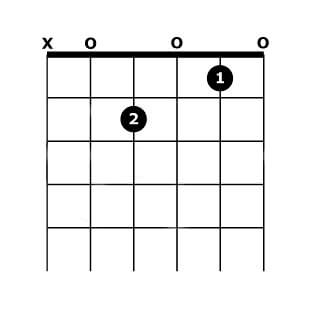
With the A minor chord, you can also use an alternative to remove a finger while keeping the other 2 anchored. By starting with the A minor chord, all you need to do then is remove the third finger. Now it’s an A minor 7 chord.
Then, replace the finger to the correct position to reform the A minor chord. Just the exercise of removing the third finger from the fretboard and putting it back is great for them.
It’s going to feel heavy when you do it, but after a while, you will build strength and the pain will subside. This will then become easy!
Simple E Major Anchor
Another great anchor that is super simple is to form an E major chord and then remove the first finger. You now have an E minor chord very simply.
These simple movements are great for beginners that are experiencing finger pain. You want to start with single-finger movements to gain strength.
While doing these exercises, you don’t need to press down hard or strum. You simply want to move back and forth between chords. Don’t worry, there will be plenty of strumming soon to come!
Intermediate Techniques
Maybe you are past the point of sore fingers and are struggling with quick chord changes. Then this is the point of the article for you.
Now, practice is of course the only way to improve. There is simply no way around this. But there are things to look for in order to improve.
We need to locate your points of struggle to get more practice time in on them. That’s how to work past it quicker.
Find Problematic Changes
A lot of new players are quick with some chords, but struggle with others. Problem is, when you sit down to a practice session, you are more likely to work on the chords you’re good at.
I see a lot of new players who do this and never work as much on the harder chords, and then don’t progress. So you need to recognize which chords give you the most trouble.
Sometimes they might be easier when switching from one chord than others. This makes it harder to recognize them.
Self Measuring Exercise
One great way to recognize problematic guitar chord changes is to plan out an exercise. You should already be working on the most common chords for beginners at this point.
Now take these chords and create a few different change routines. For example:
- C major.
- G major.
- D Major.
Run through these chords without rushing the easier changes. Keep the timing the same. Then ask yourself these questions:
- When you finger them, is it accurate?
- Is there any buzz?
- Did it feel effortless?
- Can you do it again a few times, exactly the same?
If it was easy, and you are confident with those chords, change them. Mix them up and perform the exercise again. This time with a new chord lineup!
Locating Harder Chord Changes
So after a few different exercises, you are likely to have found some hard chord changes. If you didn’t, then I would question why you are here reading this article!
So let’s take these harder chord changes and see what’s going on. Why exactly are you struggling? Here are a few things to look for:

Which Fingers Move The Farthest?
Watch for the fingers that need to move farthest between two chord changes. When you finger them, is it accurate? Sometimes it’s just that you are not quite familiar enough with the chord.
Maybe this particular change is just in need of more practice. It’s a tougher change. At any rate, schedule this into your practice routine. After a week or so of work, it should get easier.
Which Fingers Don’t Move?
If the change between guitar chords requires some fingers to stay on a string or fret, make sure it is the right one. There are some changes that require a finger change, even if it’s used in the same chord.
It can be a problem if we develop laziness because the finger can remain in that placement. This can make it more difficult for the other fingers to form the chord. If you need to lift them all and replace them, put in the effort and practice the change.
Plan Good Practice Time
Begin to work on these problematic chord changes, and make sure to allocate a good amount of time to work on them. If your practice sessions are normally an hour, work on the chord change for 30 minutes.
Do this for a couple of weeks to improve your performance. Anything difficult that you work on now will improve your playing somewhere else. And try and work on some of your favorite songs in order to stay motivated to play.
Finger Stretching Exercise
One of the best ways to strengthen your fingers is stretching exercises. These may be easy or hard for you, as everyone is different. The one thing that can be said for them is they benefit everyone!
Performing this exercise will strengthen your muscles and help with accuracy. Adding this to your practice routine will show benefits somewhat quickly. Justin Guitar has some great stretching exercises to help you.
Conclusion
Incorporating these techniques into your daily routine can help make chord changes fast. Over time, the rewards will be quite evident, until large leaps are possible.
But give yourself time, this type of skill growth is gradual. Be patient and just keep at it until you notice the growth. And when you do, make sure to mark that down as a milestone. This is a marathon and not a sprint!