Table of Contents
Guitar action is a crucial aspect to comprehend for any guitarist. It refers to the measurement of the distance between the strings and the fretboard. The instrument’s playability and tone are significantly impacted by this distance.
When considering the importance of guitar action, it’s essential to understand how it affects the overall playability of the guitar. The height of the strings can greatly impact the ease with which a guitarist can produce notes and chords.
In this Killer Rig article, we’re going to touch on guitar action. Adjustments to the action can greatly enhance your playing experience and overall sound quality. And that is something we are all looking to achieve! Let’s get started.
What is Guitar Action?
In simple terms, guitar action refers to the distance between the strings and the fretboard. It can have a significant impact on how the guitar feels and plays.
Understanding and maintaining an appropriate string height is crucial for achieving optimal playability, tonal quality, and overall musical experience.
The proper definition and importance of guitar action lie in its ability to create an ideal balance between ease of playing and sound production.
A well-adjusted action allows for comfortable fretting, smooth transitions between notes, and the ability to execute techniques with precision.
Additionally, it contributes to the resonance and sustain of the instrument, influencing its tone and projection.
Ideal Guitar Action Setting
By understanding the characteristics and effects of different action heights, you can make a better decision about adjusting your guitar’s action to achieve the right playability and tone.
Here is a guide to help you understand if your guitar action is too high or too low:
- Evaluate string height at the 12th fret: Measure the distance between the bottom of the strings and the top of the 12th fret using a ruler or an action gauge.
- Check for buzzing or rattling sounds: Play each string individually, paying attention to any buzzing or rattling noises. This could indicate that your action is too low.
- Assess ease of playing: Notice how comfortable it feels to press down on the strings. If it requires excessive force or causes discomfort, your action might be too high.
- Analyze intonation: Play open chords and check if notes played higher up the neck stay in tune. Poor intonation could be a sign that your action needs adjustment.
- Consider play style and preferences: Different players have varying preferences when it comes to action height. Take into account your playing style, finger strength, and desired tone when determining if your guitar action suits you.
- Seek professional advice if unsure: If you are unsure whether your guitar action is too high or low, consult with a skilled technician who can provide expert guidance based on their experience and knowledge.
In evaluating if your guitar action is too high or low, remember that what you prefer will probably be different from other players. This plays a significant role in finding the right balance between comfort, ease of playing, and desired tone.
Experimentation may be necessary to find what suits you best. But it’s also important to recognize that each guitar type is also different in terms of the string height. Let’s look at this in more detail:
Electric Guitars
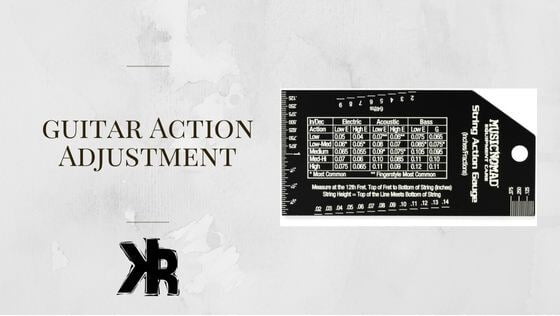
As you can see in the chart below, the low-medium setting is the average starting point for most people. Yet, it’s important to keep yourmusic style in mind. Adjust the electric guitar string height according to that for the best results.
| Electric Guitar Action Height | Low E | High E |
|---|---|---|
| Low | .05″ | .04″ |
| Low-Med (Average) | .06″ | .05″ |
| Medium | .065″ | .055″ |
| Med-Hi | .07″ | .06″ |
| High | .075″ | .065″ |
Acoustic Guitars
Acoustic guitars are much different. They typically have higher action than the electric. That’s because they count on string vibrations for sound.
As a result, the strings need to be thicker than the electric guitar. The only issue is that with thicker strings comes more tension.
Using the chart below, you will see that medium is the average setting for an acoustic guitar. If you are a more aggressive strummer, then use medium-high.
| Acoustic Guitar Action Height | Low E | High E |
|---|---|---|
| Low | .07″ | .06″ |
| Low-Med | .08″ | .07″ |
| Medium (Average) | .09″ | .075″ |
| Med-Hi | .10″ | .085″ |
| High | .11″ | .09″ |
High vs. Low Action
While the ideal action often boils down to preference, understanding the different characteristics of high and low action can guide guitarists in tailoring their setup to their playing style and genre.
High Action
Pros:
- Richer Tone: Higher action often results in a fuller, more resonant tone, especially noticeable in acoustic guitars.
- Volume: With more room to vibrate, strings on a high action setup can produce a louder sound.
- Reduced Fret Buzz: The increased distance from the frets minimizes the chance of fret buzz, even with harder strumming or picking.
- Slide Play: For those who play slide guitar, a higher action is almost mandatory to prevent unwanted contact with the frets.
Cons:
- Playability: High action requires more force to press down the strings, which can be tiring and challenging, especially for beginners.
- Bending Difficulty: Bending strings on a high action setup requires more effort, which can affect the fluidity of solos.
- Potential Intonation Issues: The farther a string has to be pressed down, the more it can potentially go out of tune, especially on higher frets.
Low Action
Pros:
- Ease of Play: Low action setups are generally easier to play, especially for fast passages, intricate solos, or complex chord shapes.
- Faster Response: With less distance to travel, strings respond quicker to the touch, ideal for rapid playing styles.
- Less Hand Fatigue: With a reduced need to press hard, players often experience less hand fatigue, allowing for longer playing sessions.
Cons:
- Fret Buzz: The proximity to the frets increases the likelihood of fret buzz, especially if the frets aren’t perfectly leveled.
- Tonal Compromise: Some guitarists believe that extremely low action can reduce the guitar’s resonance and fullness of tone.
- Limited Dynamics: With less room to vibrate, the dynamic range can be slightly limited, especially on harder strums or picks.
How to Measure Guitar Action
Knowing how to measure the action is important in achieving optimal playability. Next up, I will guide you through two methods of measuring guitar action:
- Using a ruler: With a ruler, you can get a basic measurement of the distance between the strings and the fretboard.
- Using an action gauge: An action gauge provides more precise measurements, allowing you to adjust the action to your desired preferences.
Feeler gauges can also work. These are thin, flat strips of metal that are all different thicknesses. They are precise and can help you set your guitar action.
Simply select the thickness you want to use and place the gauge between the frets and strings. If they touch the feeler gauge, you have obtained the correct spacing.
Not many people have feeler gauges, and so I’m not going to focus on them in detail. Just know that you can use them if you own a set.
Now, before we take any measurement, it’s absolutely critical that the guitar be clean and in tune. The string tension must be where you normally play it for the best results.
Measuring with a Ruler
Measuring the height of a guitar’s strings with a ruler can provide valuable information about its action. By using precise measurements, you can determine if your guitar’s action is too high or too low, allowing you to make any necessary adjustments.
Here is a 5-step guide to measuring guitar action with a ruler:
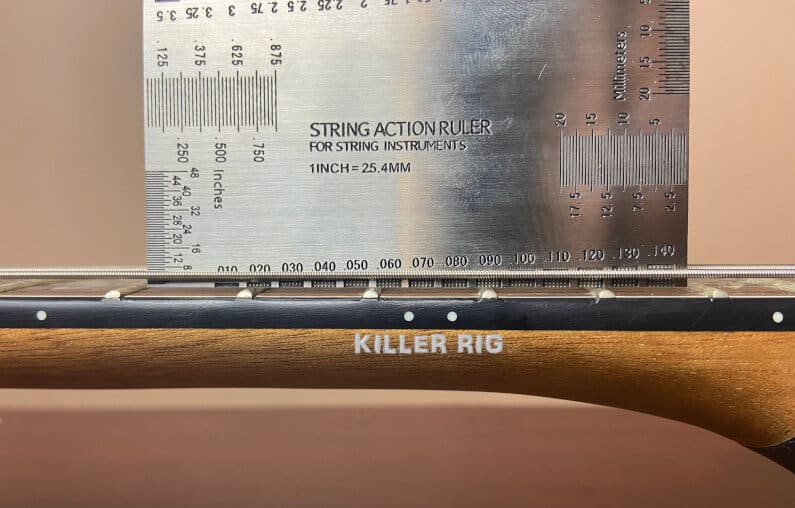
- Place the ruler perpendicular to the fretboard, resting it on top of the 12th fret.
- Measure the distance between the bottom of the ruler and the top of the 6th string (the thickest string).
- Repeat this measurement for all six strings, writing down each result.
- Compare your measurements to recommended guidelines for guitar action.
- Based on these comparisons, determine if your guitar’s action needs adjustment.
It’s important to note that measuring with a ruler may not provide as accurate results as using specialized tools such as an action gauge. However, it can still give you a general idea of your guitar’s setup and whether further adjustments are necessary.
Measuring with an Action Gauge
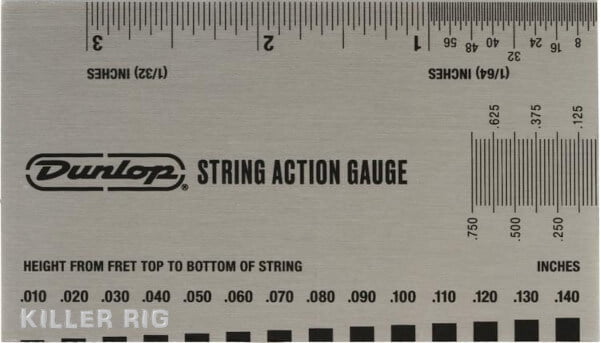
A precision gauge is an essential tool for accurately measuring guitar action. It allows for precise measurements to be taken, ensuring the optimal setup of your instrument.
But if you are in a pinch or just can’t get one, download my free printable guitar action gauge here.
Here is a step-by-step guide on how to measure guitar action using a precision gauge:
Place The Guitar On A Flat Surface:
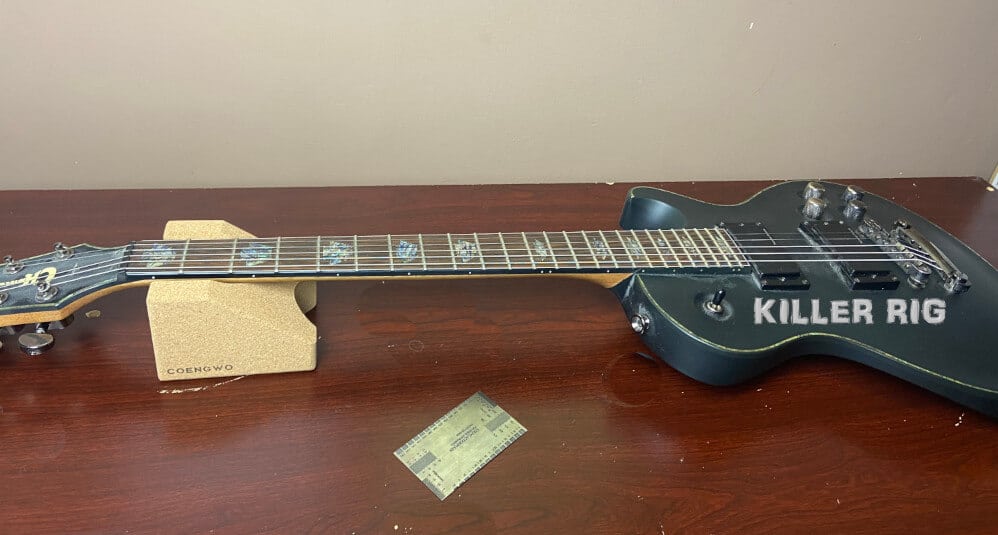
Once you have the guitar action gauge, it’s time to take a measurement. Find a flat surface to place the guitar on.
If you have a guitar neck support, this will be helpful. If you can keep the guitar level, measuring will be easier. Make sure to have enough space around you to work.
If you can’t look at the side of the neck, then you don’t have enough space. The measurement will need to be taken by looking between the strings and the frets.
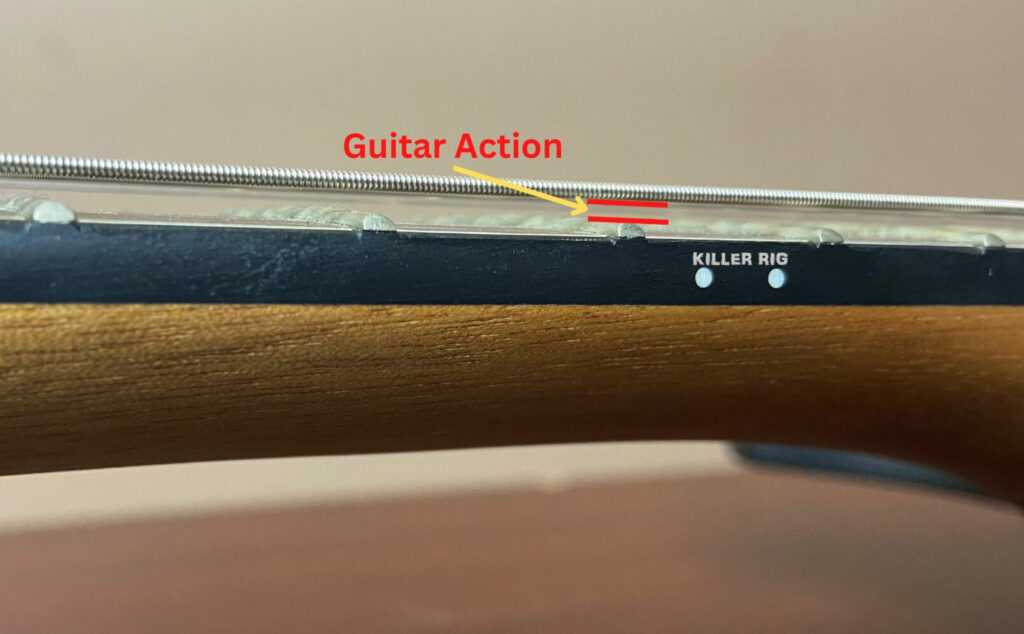
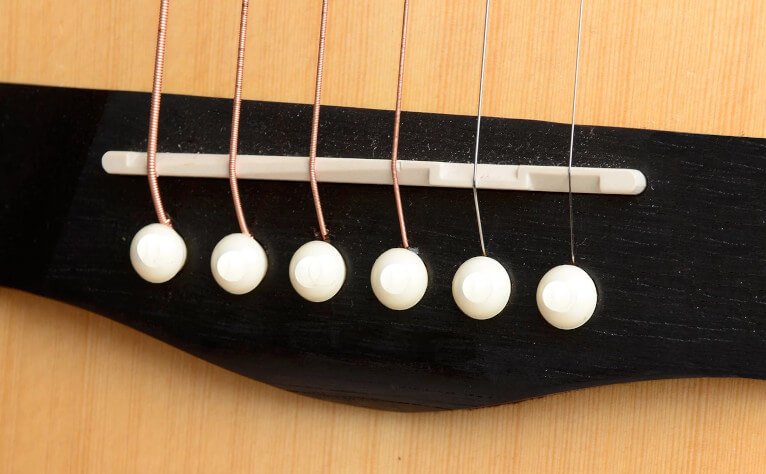
Take the Measurement:
Place the measuring tool on the frets so that it rests flat. The string height at the 12th fret is where you want to measure. This is because it’s roughly halfway between the nut and bridge.
With the tool on the fretboard, you can now view the measurement scale on the side. Record the indicator number that the bottom of the string lines up with on the tool.
Do this with each string, recording your readings. This will help you to understand the overall guitar action of each string. The height of these strings need not be the same. If they are different, this is normal.
In the picture below, you can see the tool resting on the frets. The strings line up to the measurement scale. In this case, the measurement is .08″ which is a bit high.
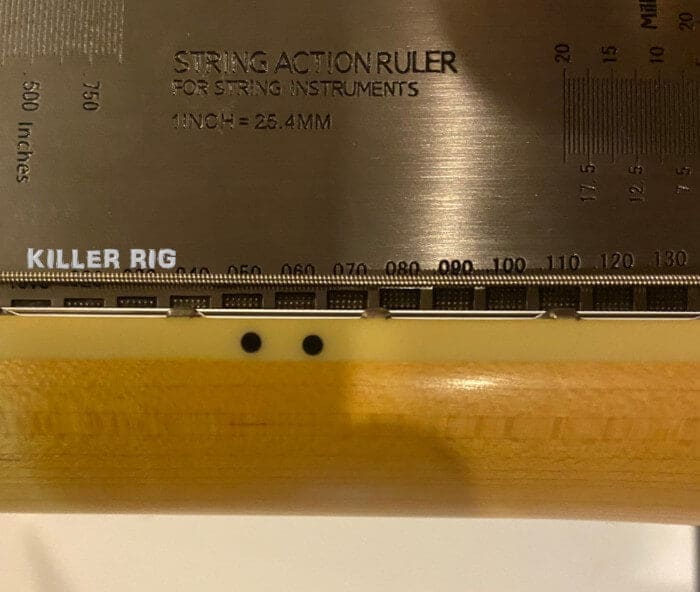
This method provides accurate measurements, allowing you to determine if your guitar action is too high or low. By utilizing an action gauge, you can confidently assess and adjust your instrument’s setup to achieve optimal playability and performance.
How to Adjust Action on an Electric Guitar
Now that you have your ideal action, it’s time to adjust your guitar. This will require some tools! You will need:
- A set of metric Allen wrenches.
- Flat Screwdriver.
- String radius gauges.
Not every guitar will require these tools, it depends on the bridge and the type you are setting up. Also, make sure that you have verified that the neck relief is set up as it should be before adjusting the action.
Be sure to use an amplifier when playing your electric guitar, so you can hear all noises. If you start to hear fret buzz while playing, you’ve likely found your setting. Just make sure to stop at that point to avoid over-adjusting the strings.
Keep in mind that there are different bridge designs that you may come across. Depending on which bridge your electric guitar is equipped with, the adjustment is different. You will find that information below.
After each adjustment, be sure to tune the strings to get the most accurate readings.
And once you have found your setting, be sure to check the height of your pickups. Sometimes when a guitar action adjustment is made, the pickups are no longer within spec.
Tune-O-Matic Bridge
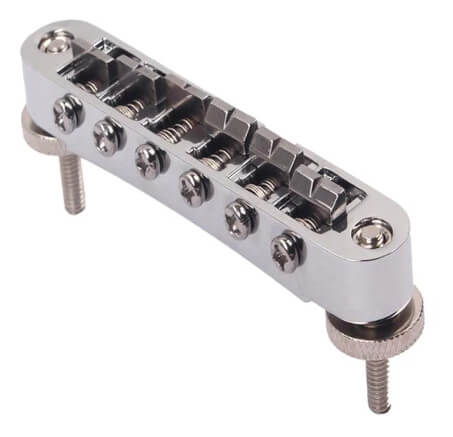
If you have a Tune-o-Matic bridge, there are typically two screws that adjust the action. The height adjustment screws are on either side of the bridge. They can be adjusted with a hex wrench, screwdriver, or knurled disks.
To lower the strings, turn the screws clockwise until you reach the desired distance. To raise or increase height, turn the screws counter-clockwise. You will want to be careful not to strip or damage these screws, so be sure to use the correct tool.
Adjustments should be made one side at a time. Then use the tool to gauge the string height. Now that both sides have been adjusted, all six strings will be set.
Fender Style
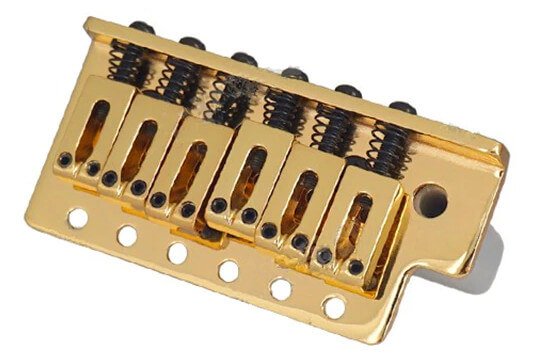
If your electric guitar has a Fender-style bridge, the process is a bit different. Each saddle must be adjusted one at a time.
There are many bridges like this that are also a part of the hard-tail family. This requires more work but will result in better accuracy.
There are 2 Allen screws on each saddle used to raise or lower the string. Each string will need to be measured to get the right height based on your desired spacing. It’s also important to remember that the strings must match the fretboard radius.
This is where radius gauges can be a big help if you don’t mind putting in the extra time. You can find the tool here.
If you choose not to use the tool, then adjust the strings until you have the right action without any fret buzz.
Floyd Rose
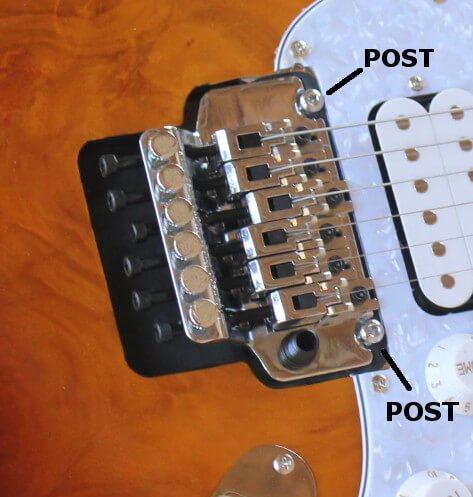
These bridges are frequently found on guitars designed for tremolo use. The Floyd Rose system is designed to keep the string tension constant when using the tremolo arm. Yet it’s surprisingly easy to adjust the guitar action.
The lock nut must first be loosened before tuning your strings to pitch. Are you setting your action because you have changed the string gauge?
Then you need to make sure the Floyd Rose system is balanced by adjusting the spring tension.
Once you have your action measurements, it’s as easy to adjust as turning the 2 posts on either side of the bridge.
You will need a 3-millimeter Allen key to do so, but it really is that easy. Make sure you tune after each adjustment and be careful not to damage the screw posts.
How to Adjust Action on an Acoustic Guitar
Adjusting the action on an acoustic is much different. In fact, this procedure should be done by a professional who knows exactly what to do.
But, if you feel confident, it’s possible to do. But proceed at your own risk.
Just keep in mind that if you use a capo often, then the action will need to be tested with it as well. Because a capo lowers the string height when applied, this will also need to be considered. This will be the same with slides.
Saddle Modification
You’ll need to modify the saddle’s thickness to alter the string height. It may take longer and be more difficult to complete this process.
Therefore, it’s crucial to have patience! It might be a good idea to hire a professional if you are unsure of your competence to handle this one.
The saddle on an acoustic guitar can be removed by lightly tapping it free. First, the string tension must be loosened.
This will allow you to either sand down the bottom of the saddle to lower the action or add shims to raise it. In some cases, a new saddle will be required in order to raise the action.
Before making any adjustments to an acoustic guitar, make sure the bow in the neck is correct. In most cases, the action will return to a comfortable position when this is set correctly.
Conclusion
As we come to the end of our discussion on guitar action, it is essential to conclude with understanding how to find the right guitar action that suits your individual preferences.
Personalization and experimentation play crucial roles in this pursuit. By exploring various guitar actions and adapting them to your playing style, you can discover the perfect balance between playability and sound quality.
Ultimately, finding the right guitar action involves trial and error, as you experiment with different setups and adjustments to achieve your desired tone and comfort.
FAQs
Does Higher Action Give you a Better Tone?
A higher action will change the tone, but there is no guarantee that it will make it better. Moving the strings farther from the pickups will lessen the output and the sonic response. This could be good, but it might also be a worse sound.
The same is true with the acoustic guitar. By moving the strings away from the soundboard, the tone will change slightly. But whether it’s a good change or not will only be realized by trying it.
The only time making the action higher is truly better, is when the strings are buzzing against the frets and are simply too close!
Why do cheap guitars have high action?
Cheaper guitars usually have a higher action because it makes the manufacturing process less complicated.
High action hides issues like wobbly frets or a bent neck, which you’ll often find in cheaper guitars. But don’t fret, a little tweaking can bring down the action on a cheap guitar, making it easier on your fingers.
Does Low Action Help with Playing Fast?
Many players assume that lower action will help them play faster. And they would be right, this is in fact true. But first you have to determine what is low action and what is too high.
If you find that the strings require a lot of effort to push on in order to fret them, then yes, the string height is too great. Your technique will then suffer due to the extra time required to press strings farther.
Lowering the action will help you increase your speed across the fretboard. The motion should be more of a glide across the strings, with little to no effort pressing the strings.
Is Bending Easier with lower Action?
Low action isn’t necessary for string bends. Any guitar set to factory specification or even a tad lower will work perfectly fine. The only time bending strings will become difficult is when the string height is too high.
This will make bending hard because the string will want to move in two different directions. Normally this means it will slip over the top of your fingers, which ruins any good technique quickly.