Table of Contents
Marshall amps are a must-have for musicians. To get everything you can out of one, you need to know how to adjust its settings. Don’t just randomly turn knobs, but craft the perfect sound that suits your music and style.
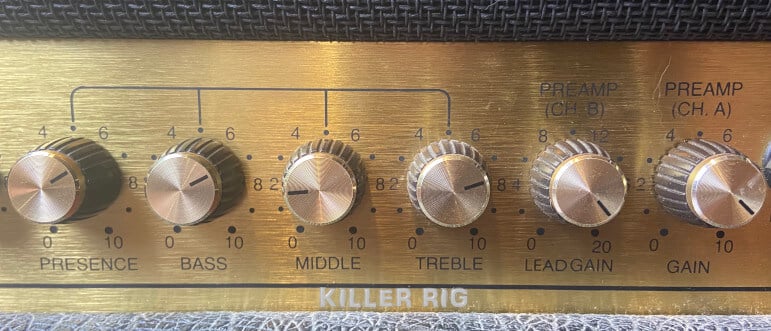
Get to know the controls on your Marshall amp. Each knob has a purpose, allowing you to shape your tone to your preferences.
The gain control, for instance, affects the amount of distortion. And the treble, middle, and bass knobs help refine the tonal balance. Reverb and presence add depth to your playing.
Everyone’s needs are different. If you play heavy metal, you might prefer high gain and boosted bass. If you’re into funk or jazz, a cleaner tone with less distortion and more mid-range could be better.
Remember, there’s no right or wrong. What’s important is that it sounds good to you. In this Killer Rig article, I’ll help you try something different or unconventional. It could be the key to making your music stand out.
Understanding the Controls on a Marshall Amp

The controls and knobs of a Marshall amp play a crucial role in shaping the sound and tone. To master them, one must grasp their functions and how they interact. Here are three key points to consider:
- Tone Controls: By adjusting the Bass, Middle, and Treble knobs, you can shape the overall tonal quality of your guitar. Experimentation with these controls allows musicians to achieve the desired sound for different genres and playing styles.
- Gain and Volume Controls: These knobs govern the amount of distortion and overall loudness of the amp. Balancing these settings is vital to achieving the right amount of grit and power without sacrificing clarity.
- Presence and Reverb Controls: The Presence knob adds presence and brightness to the sound, while the Reverb knob controls the level of reverberation. These controls enable artists to add depth and ambience to their performance, giving their sound a more immersive quality.
Additionally, the amp may have other features like a Footswitch input for easy control during live performances or an Effects Loop for integrating external effects pedals seamlessly.
I remember attending a local band’s gig where their guitarist effortlessly achieved a wide range of tones. When asked about his secret, he explained how he had spent countless hours experimenting with the controls and knobs on his Marshall JVM.
His dedication paid off, as he was able to find the perfect balance to create certain sounds for each song, captivating the audience throughout the entire performance.
Understanding the different controls and knobs on a Marshall amp opens up a world of possibilities for musicians. So, take the time to explore and experiment with these settings to unlock your full potential and create sounds that resonate with your style.
Volume and Gain controls
Two main controls on a Marshall amp are Volume and Gain. They both shape your sound, but have specific functions. Volume adjusts the loudness without affecting distortion.
Gain sets the preamp distortion. More overdrive and sustain is created by increasing the Gain. Lower settings give cleaner sounds.
To get the most out of these controls:
- Set both to 12 o’clock for a neutral sound.
- Experiment to find your own sweet spot.
- Adjust Gain before Volume.
- Consider others if performing live.
Mastering these controls can open up new sonic possibilities and help you reach tonal nirvana.
EQ controls (Bass, Middle, Treble)
EQ controls on a Marshall allow the user to adjust bass, middle, and treble frequencies in their guitar sound. Each knob affects a certain range, for detailed tone.
The following table shows the frequency range and purpose of each control:
| Control | Frequency Range | Purpose |
|---|---|---|
| Bass | 20 Hz – 250 Hz | Adjusts low-frequency or bass tones |
| Middle | 500 Hz – 2 kHz | Controls mid-range frequencies |
| Treble | 3 kHz – 20 kHz | Modifies high-frequency or treble tones |
A few details to note:
- Balance is key when using these EQ controls.
- Experienced players experiment with settings to get their desired sound.
Setting Up the Amp for Different Musical Styles
Setting up the amplifier to suit various musical styles involves making adjustments to achieve the desired sound. Different genres require specific settings for tone, gain, and EQ controls. Here are the recommended amp settings for different musical styles:
| Musical Style | Tone Setting | Gain Setting | EQ Setting |
|---|---|---|---|
| Blues | Warm and mellow | Moderate | Boost low and mid frequencies |
| Rock | Punchy and powerful | High | Boost low, mid, and high frequencies |
| Jazz | Smooth and articulate | Low | Scoop mid frequencies, boost low and high frequencies |
| Metal | Aggressive and heavy | Very high | Boost low and high frequencies, scoop mid frequencies |
It’s important to note that these settings are general recommendations and can be adjusted according to personal preferences and the specific characteristics of the guitar and amplifier being used.
Additionally, it’s worth mentioning that the placement of the amplifier in the room and the use of effects pedals can also greatly affect the final sound. Experimenting with different settings and configurations can lead to great tones.

Rock and Metal Settings
Rock and metal music need special amp settings to get the desired sound. Here’s a breakdown of settings that will help you rock like a pro!
Gain and distortion settings are crucial for a powerful and aggressive sound. Increase gain for more bite and crunch. But, don’t overdo it! This can quickly lead to unwanted noise. Find a balance between clarity and heaviness with the distortion level.
EQ settings can shape your sound too. Boost mid-frequencies for warmth and presence. Dial in moderate/high bass and adjust treble to keep clarity. Just work on keeping the sound tight and not muddy.
Delay and reverb help create atmosphere in rock and metal. Set short delay for rhythms, longer for solos. Add reverb for space, but not too much. They are there to compliment your sound, not overwhelm it.
Use your guitar’s volume control. Roll back volume for softer sections or add punch. Play around to find what works best for each section of a song.
These are just starting points. Everyone has their own preferences. Experiment with settings until you find your unique sound.
Here are my favorite settings for more aggressive sounds:
- Gain: 8
- Treble: 6
- Mid: 5
- Bass: 6
- Reverb: 2
Understand how each adjustment impacts your overall tone and adapt accordingly. Keep practicing and exploring, then you’ll find the perfect amp settings that set you apart in the rock and metal world!
Clean and Blues Settings
For the ideal tone, here are the settings you can alter on your amp:
- Gain: Low-Mid.
- Treble: Mid-High.
- Mid: Mid-Low.
- Bass: Mid-Low.
- Reverb: Varies.
For a clear and clean sound, dial the gain to the low-to-mid range. I like to set it somewhere around 4 on the dial.
To make your sound brighter and more striking, adjust the treble to the mid-to-high level. For me, I prefer a setting of 5, but some like it a bit higher.
Tweak the mid and bass frequencies to shape your tone. I like settings of around 4-5 for both, but emphasize or tone it down as you get started. Then, experiment with the reverb to add depth and atmosphere.
Jazz and Classic Settings
It’s key to realize that both jazz and classical music need a pristine and balanced sound. Begin by setting the amp to the clean channel. The gain and volume knob should be set to a moderate or low level. Do not crank it up too sharply to dodge any unwanted distortion.
Next, concentrate on the EQ of your sound. Jazz and classical songs usually crave a warm and smooth tone with accentuation on different frequency ranges. Here is the suggested EQ settings for jazz and classic music:
- Gain: 2-3
- Treble: 5
- Mids: 6
- Bass: 6
- Reverb: 4
By finetuning these settings, you can acquire a harmonized sound which enhances the intricate tunes and harmonies found in jazz and classical genres.
Also, think about adding some reverb effect to your amp settings. This can aid in creating a sense of space and depth in your sound, improving the overall listening experience.
Test out different levels of reverb until you find one that fits the style you are playing.

Tips for Experimenting with Marshall Amp Settings
Tips for exploring various Marshall amp settings when getting started:
- Gain control: Adjust the gain knob to find your desired level of distortion. Keep in mind that higher settings will produce a more saturated and aggressive tone. While lower settings will result in a cleaner sound. The low end will also be affected by this setting.
- EQ adjustments: Explore the different frequencies by tweaking the bass, mid, and treble knobs. Increasing the bass will add depth and warmth, while boosting the mids can enhance your guitar’s presence. Adjusting the treble will allow you to shape the overall brightness of your tone.
- Effects integration: Experiment with adding effects pedals to your amp setup for additional sonic possibilities. From reverb and delay to modulation and overdrive, the combination of various effects with different amp settings can create sounds and textures.
- Speaker cabinet selection: Don’t forget to consider the impact of the speaker cabinet on your amp’s tone. Different cabinets can significantly alter the sound, so try experimenting with various sizes, speaker configurations, and materials to discover the combination that suits your style.
It’s important to note that these tips merely scratch the surface of the vast possibilities offered by Marshall amp settings.
Every guitarist’s journey is unequal, so take the time to explore and discover your own preferences. Remember, the best way to learn and improve is through experimentation and practice.
Just like the iconic models themselves, the history of amp settings exploration is rich and diverse. Over the years, countless legendary guitarists have pushed the boundaries and redefined what’s possible with their Marshall amplifiers.
From Jimi Hendrix’s legendary “Woodstock” performance to Slash’s iconic solos with Guns N’ Roses, the innovative use of amp settings has shaped the sound of rock music.
So embrace the legacy and push the limits of your Marshall to create your own signature sound.
Related: Slash Amp Settings on a Marshall.
Common Mistakes to Avoid
Setting up a Marshall amp can be a daunting task, but with some careful planning and consideration, you can avoid common mistakes that may hinder your sound quality. Here are three key points to keep in mind:
- Improper Gain and Volume Levels: One common mistake is setting the gain and volume levels too high. While it may seem tempting to crank up the settings for a louder sound, it can result in unwanted distortion and a loss of clarity. It’s important to find the right balance for your desired tone without sacrificing the quality of your sound.
- Neglecting EQ Adjustment: Another mistake to avoid is neglecting the equalization (EQ) settings of your Marshall amp. Each guitarist has different preferences, and the EQ settings play a crucial role in shaping your tone. Take the time to experiment with the bass, mid, and treble controls to find the right balance that complements your playing style and desired sound.
- Poor Speaker Placement: The placement of your amp’s speakers can greatly impact the overall sound quality. Avoid placing the amp directly against a wall, as it can cause unwanted vibrations and muffled tones. Instead, aim for a position where the sound can project freely, and the amp can resonate without any obstructions.
While these three points touch on common mistakes to avoid when setting up a Marshall amp, it’s important to note that every guitarist and setup is very different.
Take the time to experiment and fine-tune your settings to achieve the best sound possible for your specific needs.
Overdriving the Amp Too Much
Guitarists often make the mistake of over driving their Marshall amp. This results in a distorted and muddy sound, instead of the desired crispness.
Overdriving means pushing the gain or volume settings to the max. While it can add character, too much can cause unpleasantness. Find the right balance for your style.
Start with the gain control. Increase it until you get enough saturation without losing note definition. Adding gain will also result in additional low end. Experiment!
Also consider the guitar. Different guitars have different outputs, pickups, and tonal characteristics. Adjust the gain accordingly.
Keep an eye (or ear) on the volume. Too much can create unwanted distortion. Gradually increase the volume while monitoring the sound.
Neglecting the Importance of EQ Adjustments
Experimenting with EQ settings will help bring out the best in each instrument and genre. Not taking the time to adjust can leave your audience unimpressed.
EQ adjustments aren’t just about boosting or cutting frequencies. They allow for creating depth, by fiddling with resonance and presence. These small changes can make a huge difference.
There are many players who are afraid to touch their EQ. But this leaves your tone undiscovered and sometimes unimpressive. Don’t worry, you can turn the knobs back, but at least try out some new settings.
Conclusion
Searching for your own amp settings is a must for any guitarist. It helps you make your own sound, be unique, and express yourself musically!
Fine-tune your Marshall amp and create a tone that fits you. Whether you like a gentle or raw sound, exploring different combinations will help you find the right balance. Experimenting could open up amazing possibilities. Try out different genres and sounds! Don’t be scared to be creative.
Also experiment with effects pedals. Mix and match them with amp settings for different results. You may discover a special mix that becomes your signature sound.
Pro Tip: Take notes of what works. This keeps your live performances or recordings consistent, allowing you to easily recreate those perfect tones.
FAQs
How can I set the perfect tone on my Marshall Amp?
To set the perfect tone on your Marshall, start by setting the volume and gain controls to your desired levels.
Adjust the bass, middle, and treble controls to achieve the desired tonal balance. It is recommended to start with all controls at 12 o’clock and make small adjustments until you achieve the desired tone.
How can I achieve a classic Marshall Amp sound?
To achieve a classic Marshall amp sound, start by setting the volume and gain controls to a moderate level. Increase the bass and treble controls to enhance the low-end and high-end frequencies.
Set the middle control to taste. Experiment with the presence to add brightness. Consider using an overdrive or distortion pedal for additional crunchiness if desired. It may take some trial and error to find the perfect settings for your specific amplifier and guitar.
Can I use the same settings for different genres of music?
While the settings of a Marshall can be tweaked to suit different genres of music, it is recommended to make adjustments based on the specific requirements of each genre.
For example, for heavy metal, you may want to increase the gain and add more presence. For clean, jazzy tones, you may want to decrease the gain and increase the treble. Experimentation is key to finding the perfect settings for different music genres.
Are there any recommended amp settings for beginners?
For beginners, it is recommended to start with all the controls on your Marshall amp set to 12 o’clock.
From there, make small adjustments to each control while playing and listening carefully until you achieve a tone that you like.
Keep in mind that different guitars and playing styles may require additional adjustments. Don’t be afraid to experiment and trust your ears to find your own tone.

