
Table of Contents
Orange Amplifiers, with their bright color and unique sound, have been a staple in the music industry for decades. Known for their rich, warm tones and versatile controls, these amps have found their way into the hearts of guitarists across genres. But the right Orange amp settings are essential.
The way you dial in the gain, tweak the bass, or adjust the treble can transform your sound from angelic to hellishly aggressive in an instant. Whether you’re a seasoned pro or just plugging in for the first time, understanding the controls on an Orange Amp can unlock a world of musical possibilities.
In this Killer Rig article, we’ll explore the specific controls they offer, and provide insights into achieving the perfect tone for various genres.
Related Articles:
- Fender amp settings.
- Marshall amp settings.
- Vox amp settings.
- Line 6 amp settings.
- Peavey amp settings.
Understanding Orange Amp Settings
To comprehend the intricacies of Orange Amp settings, it’s essential to understand their operation. These settings allow musicians to manipulate their sound according to their desired tonal preferences.
By adjusting the various knobs and switches, players can shape the EQ, gain, and overall volume of their Orange amplifier.
A comprehensive understanding of Orange Amp settings necessitates an exploration of the different parameters that can be adjusted. Here is a breakdown of the key components and their functions:
- EQ Controls: These knobs enable musicians to fine-tune the bass, middle, and treble frequencies of their sound. By adjusting these settings, the tone can be customized to suit individual preferences and musical genres.
- Gain Control: The gain control determines the level of distortion or overdrive in the amplifier’s signal. It enables musicians to achieve a wide range of tones, from clean and crisp to gritty and saturated.
- Master Volume: The master volume knob regulates the overall loudness of the amplifier. Careful adjustment of this parameter ensures that the sound remains balanced and at an appropriate level.
- Reverb: Some Orange amplifiers feature a built-in reverb effect, which adds depth and ambiance to the sound. By adjusting the reverb control, musicians can add a sense of space to their playing.
- Other Controls: Depending on the Orange amplifier model, there may be additional controls such as presence, resonance, or specific channel selectors. These parameters offer further versatility in tone shaping.
These are the main controls that allow musicians to shape their desired sound. While the gain and volume dictate the overall dynamics and loudness, the treble, middle, and bass knobs provide control over the tonal range.
The presence knob adds clarity and chime to the sound. Finally, the master volume determines the overall output level.
These controls may differ slightly depending on the specific model of Orange amp you are using. It’s important to consult the user manual or explore the specific features of your amp to fully understand how these controls interact and influence your tone.
To ensure you make the most of your Orange amp’s capabilities and explore the full range of sounds it can produce, we’re going to look into these knobs and their function in a bit more detail.
Volume
In audio tech, volume is the loudness or softness of sound from a device. It’s measured in decibels (dB), and you can adjust it with a knob or button. Volume levels can affect the sound power and the listening experience.
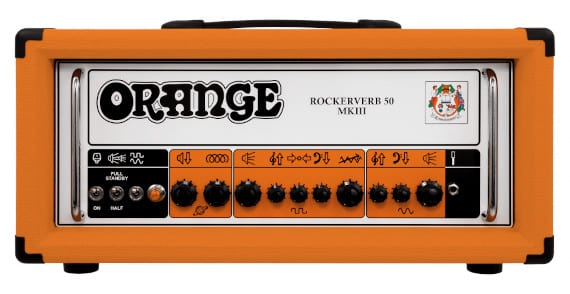
Most Orange amplifiers have a volume control on every channel when there are more than one. Sometimes you might find that the controls are labeled, and sometimes they are not.
Instead, you will need to look for the symbols they use. For volume, this is the symbol of a speaker and lines projecting from it.
One thing to keep in mind is that when the volume is turned up, at some point, the tube power section will begin to break up. This power amp distortion can be pleasing, but the volume will need to be quite loud.
Too much volume can damage your hearing. So, listen at comfortable levels and take breaks when you’re exposed for a long time.
I remember when I once turned up the volume too much on my headphones. The sudden sound surprised me and made my ears hurt. Since then, I’ve paid more attention to the volume and make sure it’s not too loud. And if it needs to be, use good hearing protection.
Gain
Gain is the control of the signal’s amplification before it reaches the volume stage. It’s the character and color of your sound, defining how clean or distorted your tone will be.
How Does Gain Affect Tone?
- Clean Tone: With the Gain knob set to a lower position, your Orange amp will produce a clear and pure sound. It’s the canvas for jazz, blues, or any genre where clarity is king.
- Crunch Tone: As you turn the Gain knob higher, you’ll start to hear a slight break-up in the sound. This “crunch” is perfect for rock and blues, adding a bit of edge and attitude without overwhelming distortion.
- High-Gain Tone: Crank the knob further, and you’ll unleash the beast. The sound becomes heavily distorted, thick, and aggressive. It’s the realm of heavy metal, hard rock, and genres that demand a powerful presence.
The Gain control doesn’t work in isolation. It interacts with the EQ settings (Bass, Mid, Treble) to shape the overall response. Higher settings might emphasize certain frequencies, adding richness to the mids or brightness to the treble.
Experimenting with Gain and EQ together opens up a wide spectrum of sonic landscapes. But be warned, too high and the bass will turn into mud, which is a loss of clarity and character in your tone.
Tips for Using Gain on Your Orange Amp
- Start Moderate: Begin with the Gain at a medium setting to understand its effect on your tone. Gradually increase or decrease to find your sweet spot.
- Consider Your Guitar: Different guitars respond differently to Gain settings. Spend time exploring how your specific instrument interacts with the Gain control.
- Balance with Volume: Gain and Volume work hand in hand. Finding the right balance between them ensures that you achieve the desired distortion without losing control over the overall loudness.
Treble, Middle, and Bass
Let’s explore the treble control. This adjusts higher frequencies in the audio spectrum. Increasing treble makes tone brighter and crisper, guitar strings then become clearer. Reducing treble can soften harsh sounds and make the output smoother.
Next, we have the middle control. This affects mid-range frequencies. Increasing it makes notes more prominent and clear, essentially allowing them to cut in a mix better. Reducing it makes other instruments stand out more. Too much and the tone can become “boxy”.
Bass is responsible for lower frequencies. Increasing bass adds depth and makes notes and chords thump harder. Decreasing bass creates a more neutral sound. This can also make things tighter sounding and even loose when bass is added.
To get the most out of these controls:
- Try different settings to find your desired sound.
- Adjust one control at a time.
- Remember speakers or headphones may limit how much you can adjust.
- Think about your surroundings.
- Listen to what sounds best to you.
Just don’t be afraid of using the controls. This is how great tones are found and established. There are far too many players who don’t use the controls and never find their true sound.
Adjusting the Settings for Different Genres
Adjusting the tone of an Orange Amp to suit different musical genres is an art form. Here’s how you can tailor your sound for various styles:
Rock
Rock music often demands a powerful and gritty sound. Here’s how you might set up your Orange Amp for rock:
- Gain: Medium to High – for that classic rock crunch.
- Bass: Boost for depth – to give the rhythm a solid foundation.
- Mid: Slight cut for clarity – to let the guitars cut through the mix.
- Treble: Moderate for brightness – to add some sparkle to the sound.
My Favorite Rock Settings: For a powerful rock sound, I like to set the gain around 5 to give it some edge. The bass is set at 5 for a solid foundation, while the mid is slightly cut to 4 for clarity. The treble is at 5 to add some sparkle.
Blues
Blues requires a warm and soulful tone. Here’s a possible setup:
- Gain: Low to Medium – to add some warmth without overpowering distortion.
- Bass: Moderate – to keep the sound grounded.
- Mid: Boost for presence – to emphasize the expressive guitar lines.
- Treble: Slight cut for smoothness – to soften the edges.
My Favorite Blues Settings: For a warm blues tone, I prefer the gain at 4, just enough to add warmth. The bass is set at 6 to keep the sound grounded, with the mid boosted to 6 for expressiveness. The treble is slightly cut to 4 for a smooth finish.
Jazz
Jazz often calls for a clean and sophisticated sound. Here’s how you might achieve that:
- Gain: Low – for a clean and articulate tone.
- Bass: Boost for richness – to add some fullness to the sound.
- Mid: Cut for smoothness – to keep the sound mellow.
- Treble: Reduce for warmth – to round off the high frequencies.
My Favorite Jazz Settings: For a clean sound, I like the gain low at 3. The bass is boosted to 5 for fullness, with the mid cut to 4 for mellowness. The treble is reduced to 4 to round off the high frequencies.
Metal
Metal demands an aggressive and intense sound. Here’s a possible setup:
- Gain: High – for aggressive distortion and sustain.
- Bass: Boost for thickness – to give the sound weight.
- Mid: Cut for scoop effect – to create that modern metal sound.
- Treble: Boost for sharpness – to add bite to the sound.
My Favorite Metal Settings: For an aggressive metal tone, I set the gain high at 7 for intense distortion. The bass is boosted to 6 for weight, with the mid cut to 3 for that modern metal sound. The treble is boosted to 6 to add bite.
Experimenting with Effects
Experimenting with Effects can be an exciting part of using Orange Amps. By manipulating different effects, musicians can achieve unique sounds and enhance their playing experience.
Whether it’s exploring various pedal combinations or adjusting settings on the amp itself, experimenting with effects allows for endless creative possibilities.
To better understand the different effects that can be experimented with, let’s take a look at the following table:
| Effect Type | Description |
|---|---|
| Distortion | Adds grit and gain to the tone, creating a heavier sound. |
| Reverb | Adds depth and spaciousness to the tone, simulating the sound of playing in different acoustic environments. |
| Delay | Creates an echo effect by repeating the sound with a time delay. |
| Chorus | Adds thickness and movement to the sound by duplicating it and slightly detuning one of the duplicates. |
| Phaser | Produces a swirling, sweeping sound by combining the original signal with a phase-shifted signal. |
Each effect serves a unique purpose and can be used in combination with others to achieve a desired sound. For example, combining distortion and delay can create a powerful and sustained tone, while adding chorus to the mix can give it a dreamy and textured quality.
When experimenting with effects, it’s essential to consider the order in which they are connected. Placing a distortion pedal before a delay, for instance, can result in a different sound compared to placing the delay pedal before it.
The latter is incorrect and will ruin the delay effect quality. So be careful when connecting effects.
Additionally, adjusting the settings on each effect can drastically alter the overall sound. It’s recommended to start with conservative settings and gradually make adjustments to find the desired sound.
Remember that experimenting with effects is a personal process, and what works for one musician may not work for another.
It’s important to trust your instincts and explore different combinations to discover a unique sound that reflects your musical style and preferences. Make sure to take advantage of your effects loop as well, this is important for high quality tone.
Reverb and Delay
To gain insight into the effects of Reverb and Delay, let us investigate their features and how they can be altered. Reverb can be found on the amps in most cases, delay will need to be added by a pedal in the loop.
- Reverb adds ambiance to your guitar sound, making it feel more alive. On an Orange Amp, you can simulate everything from small rooms to massive halls, offering various options to achieve different tonal qualities.
- Delay provides precise control over echoes and timing. By adjusting settings like feedback, delay time, and mix level, guitarists can create complex rhythmic patterns or subtle enhancements to individual notes or chords.
My Favorite Settings: For a rich reverb, I like to set it at 4, giving a sense of space without overwhelming the sound. For delay from a pedal, moderate feedback provides a nice echo effect without becoming repetitive.
Pro Tip: Experiment with different combinations of Reverb and Delay settings with your Orange Amp to craft unique textures in your guitar playing. Remember, even small adjustments can make a significant difference in adding depth and spatial dimension to your sound.
Overdrive and Distortion
Overdrive and Distortion are two unique effects that can add more depth to tone. But how do they differ?
Overdrive: It adds warmth and subtle saturation to the sound, enhancing a tube amplifier. It gives a mild distortion effect that still keeps the dynamics of the signal. This will need to be added to your signal path with a pedal.
Distortion: This effect is more intense. It creates aggressive tones by heavily clipping the waveform. It’s often associated with genres like rock and metal. This is where your Orange amp shines, by providing tube saturated distortion at it’s finest!
My Favorite Settings: Personally, I don’t use an overdrive pedal with an Orange. For any extra push, I tend to prefer a boost pedal. For Distortion, cranking it up to 7 or 8 brings out the aggressive and heavy character that Orange Amps are famous for.
Pro Tip: Don’t be afraid to mix Overdrive, Boosts, and Distortion on your Orange Amp. Experimenting with different levels of gain and blending them can create fascinating textures, giving your tone an extra edge.
Dialing in the Perfect Sound
To achieve the ideal sound on an Orange Amp, I’ve put together six steps that will help you get a foundation started:
- Start with the Gain: Begin by setting the gain control to a moderate level. Adjust it based on the desired level of distortion or overdrive. But don’t crank it from the start.
- Tweak the Bass: Experiment with the bass control to find the right amount of low-end presence. Increase it for a heavier, loose sound, or decrease it for a tighter tone.
- Shape with the Mids: Adjust the mid control to shape the overall tone of your sound. Boosting the mids adds more warmth and punch, while cutting them can result in a scooped sound.
- Find the Perfect Treble: Fine-tune the treble control to add brightness or smoothness to your tone. Increase it for more bite and presence, or decrease it for a darker sound.
- Discover the Power of Presence: Use the presence control to enhance the high-end definition of your sound. Turn it up for extra clarity and sparkle, or dial it back for a more vintage feel.
- Experiment with the Master: Set the master control to an appropriate level to achieve the desired overall volume.
In addition to these steps, don’t forget to explore the different channels and switches available on your Orange Amp to further fine-tune your sound. Each model may offer unique features, so take the time to understand how they affect your tone.
Another thing to consider is using an attenuator to retain the amp’s natural tone while practicing or recording at lower volumes. This will allow you to use higher volume settings without loudness.
Remember, every guitar, room, and personal preference is unique, so don’t be afraid to experiment and trust your ears to find the perfect Orange Amp settings for your sound.
Pro Tip: When experimenting with different settings, keep a note of the ones that produce the most pleasing results, allowing you to recreate and refine your perfect sound effortlessly.
Troubleshooting Common Issues
When dialing in your sound on an Orange Amp, you might encounter some common issues. Here’s how to troubleshoot them:
1. Buzzing or Humming:
- Check your cables and connections to ensure they’re securely plugged in.
- Try different guitars or cables to pinpoint the problem.
- Adjust the gain setting; sometimes, a high gain can introduce unwanted noise.
2. Lack of Clarity or Muddiness:
- Play around with the equalizer settings, especially the mid and treble controls.
- Experiment with the gain control to find the right balance between distortion and clarity.
3. Sound is Too Harsh or Shrill:
- Reduce the treble and presence settings to soften the tone.
- Try lowering the gain to reduce distortion, which can sometimes cause a harsh sound.
4. Volume Fluctuations or Dropouts:
- Check the volume control on both your guitar and amp.
- Inspect the tubes and components if your amp uses vacuum tubes; they might need replacement.
5. Feedback Issues:
- Move away from the amp or adjust your guitar’s pickup settings.
- Lower the gain or volume to control feedback.
6. Unwanted Distortion or Overdrive:
- Adjust the gain control to a lower setting.
- Check the overdrive/distortion settings if your amp has them, and adjust as needed.
Remember, patience and experimentation are key when troubleshooting sound issues with Orange Amp settings.
Don’t be afraid to try different adjustments until you find the sound you’re looking for. If the problem persists, consult the manual or seek professional help from a technician who specializes in amplifiers.
Conclusion
We’ve looked at Orange Amp settings and their impact on tone and sound. We’ve played with gain and EQ, finding the balance between distortion and clarity. There are plenty of options!
But there are a few other things to keep in mind. Understand how pickups interact with the settings. Single-coil or humbucker pickups change the tone. Plus, using the effects loop feature helps to integrate external pedals.
This article is a starting point. Personalize the settings for your own musical expression. With practice, patience, and exploration, you’ll find the perfect combination of settings for your music.
Frequently Asked Questions
What are Orange Amp settings?
Orange Amp settings refer to the specific configurations and adjustments made to achieve desired tones and sounds. It involves adjusting various parameters such as gain, volume, EQ bands, and effects.
How do I set the gain on my Orange amp?
To set the gain on your Orange amp, start by turning the knob to a low level and gradually increase it until you achieve the desired distortion or overdrive. Experimenting with different gain settings can help you find the perfect balance for your playing style.
What is the best EQ setting for my Orange amp?
The best EQ setting for your Orange amp largely depends on your personal preference and the type of sound you’re aiming for. However, a common starting point is setting the bass, mid, and treble knobs at 12 o’clock and adjusting from there to enhance or reduce specific frequencies as needed.
How should I set the volume on my Orange amp?
The volume setting on your Orange amp will depend on various factors such as the size of the venue, band dynamics, and personal taste.
As a general guideline, start with the volume knob set at a lower level and gradually increase it until it blends well with the overall sound without overpowering other instruments or causing distortion.
Can I use pedals with my Orange amp?
Absolutely! Orange amps are known for their pedal-friendly nature. You can connect various pedals such as overdrive, delay, reverb, and modulation to your amp’s input or effects loop to expand your sonic possibilities and create unique tones.
How can I achieve that classic “Orange” sound?
To obtain the classic “Orange” sound, start by setting the gain at a moderate level to achieve a warm and dynamic overdrive.
Experiment with the EQ settings to emphasize the midrange frequencies and increase the presence. Don’t forget to play around with the volume to find the perfect balance of power and dynamics for your desired tone.