Table of Contents
The arrangement of guitar effect pedals in a signal chain is more than a mere sequence; it’s a strategic decision that significantly influences the final sound produced.
The order in which these pedals are placed can either enhance or diminish the clarity and quality of the tone. Understanding the principles behind pedal chain order is crucial for guitarists aiming to achieve optimal sound.
This Killer Rig article provides a comprehensive guide on the subject, highlighting the importance of each pedal’s placement and its impact on the overall guitar tone.
Key Takeaways
- Dynamics, filters, and pitch shifters: These pedals typically go at the beginning of the signal chain.
- Gain-based effects: Overdrive/distortion pedals should come next.
- Modulation effects: Chorus, flangers, phasers typically come next in the chain.
- Time-based effects: Delays and reverbs work best at the very end of the signal chain.
- Volume pedals: These can go at the beginning or end of the signal chain to provide slightly different functionality.
The Basics of Signal Chain
A signal chain refers to the path the audio signal takes from the source (in this case, the guitar) to the output (typically an amplifier or recording device).
Each component or effect introduced into this path can modify the signal, adding its unique touch to the final sound. The order of these components, especially when dealing with multiple effect pedals, plays a pivotal role in shaping the tone.
Effect pedals process the guitar’s raw signal, each introducing specific modifications. For instance, a distortion pedal might add saturation and sustain, while a delay introduces repeated echoes.
The sequence in which these modifications occur can lead to vastly different outcomes. Placing a reverb pedal before a distortion will yield a different sound than if the order were reversed.
Furthermore, some pedals act as foundational blocks, setting the stage for subsequent effects.
For example, a compressor, which falls under the category of dynamic pedals, might be used at the beginning of the chain to even out the signal’s dynamics, ensuring that subsequent effects receive a consistent input.
Understanding Different Pedal Types
Effect pedals come in a myriad of types, each designed to introduce specific modifications to the audio signal.
To make informed decisions about pedal chain order, it’s essential to have a grasp of the primary functions of common effect categories:
- Dynamic Pedals: These pedals, such as compressors and limiters, manage the dynamics of the signal. They can smooth out volume peaks, boost quieter passages, or sustain notes for longer durations. Typically, they’re placed at the beginning of the chain to ensure a consistent signal for subsequent effects.
- Distortion/Overdrive Pedals: Central to many guitarists’ setups, these pedals add saturation to the signal. Distortion offers a more aggressive tone alteration, while overdrive provides a subtler, warmer saturation. They’re often placed after dynamic pedals to ensure the saturation is applied to a consistent signal.
- Modulation Pedals: This category includes effects like chorus, flanger, and phaser. They modulate the signal to create depth, movement, and texture. Their placement can vary based on personal preference, but they’re commonly found in the middle of the chain.
- Time-based Pedals: Encompassing effects like delay and reverb, these pedals deal with the temporal aspect of the signal. They introduce echoes or simulate the sound reflections of different environments. Due to their expansive nature, they’re typically placed towards the end of the chain.
- Impedance-sensitive Pedals: Some pedals, like wah and volume, are sensitive to the impedance of the signal they receive. Their placement can be crucial, as it can affect their performance and the overall tone.
While these categories offer a general guideline, it’s worth noting that the world of effect pedals is vast and ever-evolving.
New innovations and designs continuously emerge, expanding the tonal possibilities available to guitarists. However, understanding these fundamental types provides a solid foundation for navigating the complexities of pedal chain order.
General Guidelines for Pedal Order
While the realm of pedal chain order offers a lot of room for experimentation, certain guidelines have been established over the years, based on the experiences of countless guitarists. Adhering to these can serve as a solid starting point, especially for those new to crafting their pedalboard:
- Starting with Tuners and Dynamic Pedals: It’s common practice to begin the chain with tuner pedals, ensuring the guitar is in tune before the signal undergoes any modifications. Following the tuner, dynamic pedals like compressors come into play, setting a consistent foundation for the rest of the effects.
- Placement of Distortion and Overdrive: These are usually the next in line. By placing them early in the chain, they modify the raw guitar signal, ensuring that subsequent effects process a sound that already has the desired level of saturation.
- The Role of Modulation Pedals: Modulation effects, such as chorus or phaser, typically find their spot in the middle of the chain. They add depth and movement to the already shaped sound, further enhancing its character.
- Ending with Time-Based Effects: Delay and reverb pedals are commonly placed towards the end. By positioning them here, they capture and process the cumulative sound from all preceding pedals, adding spaciousness and ambiance.
- Considerations for Impedance-Sensitive Pedals: Pedals like wah and volume, which are sensitive to input impedance, need careful placement. While many guitarists place wah pedals before distortion for a pronounced effect, some prefer it after for a subtler sweep. It’s essential to experiment and find what works best for your sound.
It’s worth noting that these guidelines are not rigid rules. The beauty of crafting a pedalboard lies in the freedom to experiment and discover unique soundscapes.
While starting with these general guidelines can be helpful, always trust your ears and intuition. If it sounds right to you, then it’s perfect.
The Impact of Pedal Order on Tone
The sequence in which pedals are arranged in a chain can drastically alter the resulting sound. Even a simple swap of two pedals can lead to a tonal difference that might be subtle or profound, depending on the effects involved.
Let’s explore how the order can influence the overall guitar tone:
Overdrive Before vs. After Modulation
Placing an overdrive before a chorus pedal, for instance, means the chorus is modulating the distorted signal. This can lead to a richer, more textured sound.
Conversely, if the overdrive is after the chorus, the clean, modulated signal gets distorted, resulting in a more aggressive tone with less modulation depth.
Delay Before vs. After Reverb
A delay pedal before reverb means the echoed notes will have a reverb effect, creating a spacious, ambient sound. If reversed, the reverb sound gets echoed by the delay, which can lead to a more defined, rhythmic echo.
Wah Before vs. After Distortion
When a wah pedal is placed before distortion, the sweep of the wah has a more pronounced effect on the frequency spectrum, leading to a more dramatic effect. If placed after the distortion, the sweep is subtler, affecting the already distorted signal.
Considering the potential impact of pedal order on tone, a table might be a useful tool. It will help to provide a side-by-side comparison of different pedal placements:
| Pedal Order | Resulting Sound |
|---|---|
| Overdrive → Chorus | The chorus effect modulates the distorted signal, leading to a richer, more textured sound. |
| Chorus → Overdrive | The clean, modulated signal from the chorus gets distorted, producing an aggressive tone with less modulation depth. |
| Delay → Reverb | The echoed notes from the delay are enveloped in reverb, creating a spacious, ambient sound. |
| Reverb → Delay | The reverberated sound is echoed by the delay, resulting in more defined, rhythmic repetitions. |
| Wah → Distortion | The wah’s frequency sweep is more pronounced, and the distorted signal accentuates this dramatic wah effect. |
| Distortion → Wah | The wah effect is applied to the already distorted signal, leading to a subtler sweep. |
While the table provides a concise comparison, it’s essential to remember that the actual impact on tone can vary based on specific pedal models, settings, and the guitar and amp used.
The best approach is to experiment with different orders, listen carefully, and determine which arrangement aligns best with your desired sound.
Pedal Chain Order Examples
Here are a few different examples with diagrams of the many pedal order layouts possible. As we have touched on, there are some pedals that need to be in certain areas. And then there are others that are flexible, depending on what you’re going for.
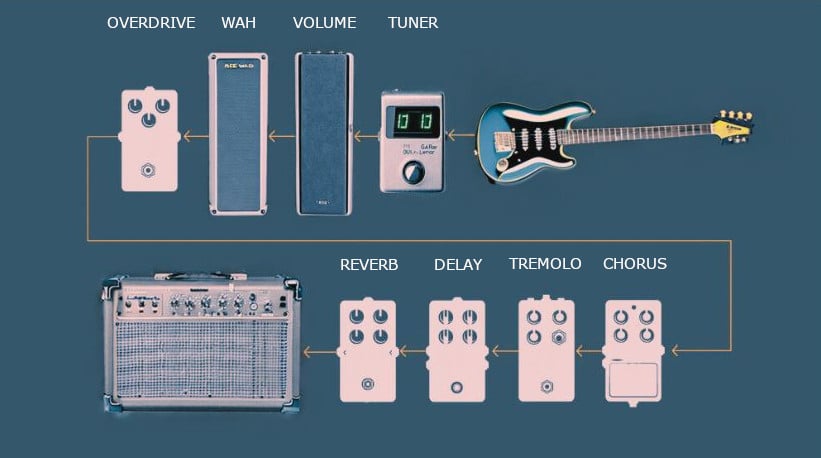
Basic Layout
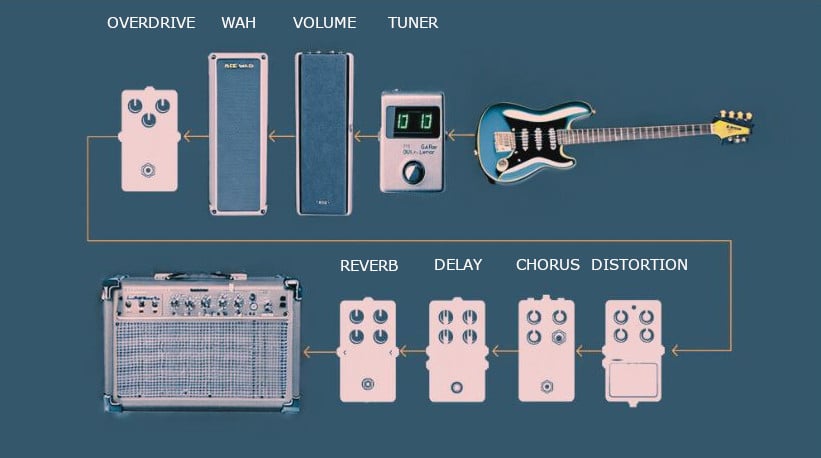
This is an example of a basic layout. The pedals in this chain are as follows:
- Tuner
- Volume
- Wah
- Overdrive
- Distortion
- Chorus
- Delay
- Reverb
Now, there are many other effects available, but this is a pretty versatile set up. It lets all the effects perform optimally based on their order.
Boost Pedal
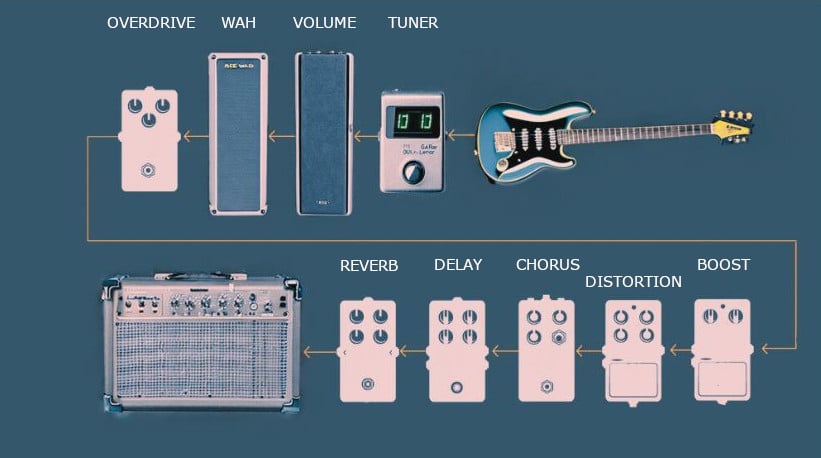
The diagram above is similar to the basic layout, except we have now incorporated a boost pedal. Some players like to use it for different things. In the diagram, I have placed it before the distortion. This allows me to push the distortion a bit harder and get a more aggressive sound.
Another arrangement is to place it after the distortion. This way, I can boost the amplifier instead. Just be careful not to drive the effects after it too hard, they might begin to clip. Find the point that you can increase the signal without any unwanted clipping.
Tremolo and Phaser
If you plan to use effects like tremolo, phaser or flanger, I normally like to place them after the chorus, but before the delay. This for me allows the chorus to be unaffected initially, as it is a powerful effect.
I can then blend the rest of the modulation effects together afterward as I require. I also normally like to place all the modulation effects after any drives or boosts, this way they don’t get altered by the clipping. But you may want to try them before, as the sound might be more of what you like.
Advanced Setups
For many guitarists, the journey into the world of pedalboards doesn’t stop at basic pedal chain configurations. As one gains experience and seeks to refine their sound further, more advanced setups come into play.
These setups allow for greater flexibility, tonal variety, and control over the signal path. Let’s explore some of these advanced configurations:
- Effects Loop: Many amplifiers come equipped with an effects loop, which is an input and output loop situated between the preamp and power amp stages. Using an effects loop can help maintain clarity, especially when using time-based pedals like delay and reverb. By placing these effects in the loop, they process the signal after the preamp’s distortion, ensuring a cleaner, more defined sound.
- 4-Cable Method (4CM): This method utilizes four cables and is designed for guitarists using amplifiers with built-in effects loops and multi-effects processors. The 4CM allows for greater flexibility in pedal placement, letting you decide which effects go before the preamp and which ones are routed through the loop.
- WET/DRY/WET Setup: This advanced configuration involves using two amplifiers and an array of effect pedals. One amp (the DRY amp) receives the unprocessed guitar signal, while the other two amps (the WET amps) receive the signal processed by effects. This setup allows for a massive stereo sound, with the dry signal in the center and the effects panned left and right.
- Parallel Signal Paths: Instead of a single chain of effects, some guitarists opt for parallel paths. This means splitting the guitar signal and processing each split separately before combining them again. This setup can maintain the clarity of the original signal while introducing effects on the parallel path.
- MIDI Control: With the advent of digital technology, many modern pedals come equipped with MIDI capabilities. This allows for preset changes, effect parameter adjustments, and even turning multiple pedals on or off with a single footswitch press. It’s a game-changer for live performances, where quick changes are essential.
- Pedalboard Switchers: These devices allow guitarists to turn on multiple pedals with a single footswitch. They can also be used to rearrange the order of effects on the fly, offering immense flexibility during performances.
While these advanced setups offer a plethora of tonal possibilities, they also come with increased complexity.
It’s essential to invest time in understanding the intricacies of each setup and practice regularly to harness their full potential. As always, the goal is to find the configuration that best serves your musical expression.
Learn more about these advanced techniques here:
Conclusion
The world of guitar effect pedals is vast, intricate, and brimming with potential. From the foundational understanding of pedal chain order to the exploration of advanced setups, each step offers guitarists a chance to shape, refine, and redefine their sound.
While guidelines and recommendations provide valuable insights, the true essence of crafting the perfect tone lies in personal experimentation and discovery.
It’s a blend of knowledge, intuition, and a keen ear. As you continue to navigate the complexities of pedal boards, remember that the journey itself is as rewarding as the destination. Embrace the process, trust your instincts, and let your passion for music guide you to sonic excellence.