Table of Contents
New technology from manufacturers brings the need for good connectivity of devices. With great tone for guitar players at an all-time high from new products, it has never been more important.
But having them all connected correctly has also become more complicated. This is where the 4 cable method can help!
The 4 cable method provides guitarists with better connectivity for effects. This includes both the effects loop and the front of an amplifier. This is important when using high gain and distortion to get the best sonic performance.
I have some great diagrams further in this Killer Rig guide. If you want to learn more about the 4 cable method, keep reading.
What Is The 4 Cable Method?
The 4 Cable Method is a specific way to connect your guitar, effects pedals, and amplifier to achieve greater tonal flexibility and sound quality.
In a nutshell, this method allows you to use your amplifier’s preamp and power amp separately. This gives you the ability to place certain effects before the preamp and others in the amplifier’s FX loop.
Here’s a quick rundown of the components you’ll need:
- Your guitar
- An amplifier with an effects loop (Send and Return ports)
- Effects pedals (both preamp and time-based like reverb and delay)
- Four cables: two standard instrument cables and two patch cables
The idea is to route your guitar signal through your effects in a way that maximizes the tonal capabilities of both your pedals and your amplifier.
Unlike traditional setups where all effects are either before the amplifier or in the effects loop, the 4 Cable Method allows for a more nuanced distribution.
For instance, you can have your overdrive and distortion pedals before the amplifier’s preamp to shape the basic tone, while placing modulation and time-based effects like chorus, delay, and reverb in the amp’s FX loop.
This avoids muddying up the sound and allows each effect to operate at its optimal point in the signal chain.
The 4 Cable Method is a game-changer for guitarists looking for the ultimate control over their sound. It may require a bit more cable management and setup time, but the payoff in tonal quality and flexibility is well worth the effort.
Pros and Cons
| PROS | CONS |
|---|---|
| Better sound quality from some effects | Can introduce noise into your signal |
| Better control of your equipment | Requires more cables |
| Guitar signal transfer is stronger | Can only be used with devices designed for the 4CM |
| Allows for more versatility from pedals and amps | Adds complexity to your setup |
Here is a video tutorial on how the 4 cable method works:
Why Use the 4 Cable Method?
The 4 Cable Method offers several advantages for guitarists who are serious about their sound quality and setup flexibility. Here are the key reasons to consider using this method:
Advantages Over Traditional Setups
- Tonal Flexibility: The method allows for precise placement of effects in the signal chain, leading to better sound customization.
- Sound Quality: Separating effects before and after the preamp can result in clearer and more distinct tones.
- Component Utilization: The method allows for the separate use of an amplifier’s preamp and power amp, providing more options for sound shaping.
Versatility
- Genre Adaptability: The setup can be adjusted to suit multiple musical styles, from rock to jazz.
- Live Performance: The method simplifies transitions between different tones and effects, making it easier to manage settings during a performance.
Long-Term Benefits
- Expandability: The setup can easily accommodate additional pedals as your collection grows.
- Quality Investment: While it may require an initial investment in cables and setup time, the improved sound quality and flexibility make it worthwhile.
Using the 4 Cable Method can lead to better sound quality, more control over your effects, and a more versatile setup. It is a practical choice for those looking to optimize their guitar rig.
Setting Up: A Step-by-Step Guide
Setting up the 4 Cable Method involves a series of connections between your guitar, effects pedals, and amplifier. Here’s a straightforward guide to get you up and running:
1. Connecting the Guitar to the Pedalboard
- Use a standard instrument cable to connect your guitar’s output jack to the input of your first pedal (usually a tuner or a compressor).
2. Routing to the Amplifier’s Input
- Connect the output of your last “pre-preamp” pedal (like overdrive or distortion) to the input of your amplifier using another standard instrument cable.
3. Effects Loop and its Importance
- Locate the “Send” and “Return” jacks on your amplifier; these constitute the effects loop.
- Use a patch cable to connect the “Send” jack to the input of your first “post-preamp” pedal (like modulation or delay).
- Use another patch cable to connect the output of your last “post-preamp” pedal back to the “Return” jack on your amplifier.
4. Final Connections and Checks
- Double-check all connections to ensure they are secure.
- Turn on your amplifier and pedals, starting with low volume settings.
- Gradually increase the volume and test each pedal to confirm the setup works as expected.
By following these steps, you should have a functional 4 Cable Method setup. This will allow you to take full advantage of both your amplifier and effects pedals, offering improved sound quality and greater tonal flexibility.

Effect Pedal Grouping
If you’re not sure which pedals and effects should go where, here is a list of the ones that should go before your preamp, and the ones that go after.
Amplifer Input
The pedals in this chain are units that will condition your signal and can be run to the input of your amplifier. For example:
- Tuners.
- Distortion Pedal.
- Overdrive Pedal.
- Fuzz Pedal.
- Wah Pedal.
- Compressor.
- Boost.
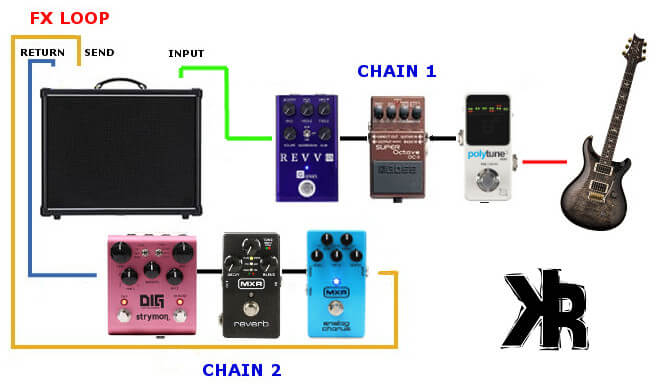
FX Loop
Your second pedal chain will consist of anything time-based or is a modulation effect. These will be run through the loop on your amplifier. For example:
- Reverb.
- Delay.
- Chorus.
- Flanger.
- Phasers.
Once you have your board set up, you can begin connecting them as per the diagram below. Effects pedals connected to your amplifier in this arrangement will provide optimal sound.
In some cases, distortion can also be run through the effects loop, if you require it to function like a preamp.
If you are running distortion pedals in the loop, always make sure to keep them first in the chain. They need to be before any time-based effects. And always make sure to have a good power supply! This is incredibly important.
What about Noise Gates?
Noise gates are a valuable tool in any guitarist’s arsenal, and they can be particularly effective when used in conjunction with the 4 Cable Method.
A noise gate works by silencing the signal when it drops below a certain threshold. Thus, effectively ‘gating out’ any unwanted noise or hum that may be present when you’re not playing.
When using the 4 cable method, a noise gate can be placed in the effects loop of your amplifier. This allows the noise gate to process the entire signal chain, including the preamp and any effects placed before it.
This can be particularly useful if you’re using high-gain settings on your amp or pedals, which can often introduce unwanted noise.
Some noise gates have the ability to clamp your signal from the FX Loop. It’s important to know how this works and where the best placement is within our signal path. What is happening when the noise gate is connected to both the input chain and the effects loop?
How To Connect
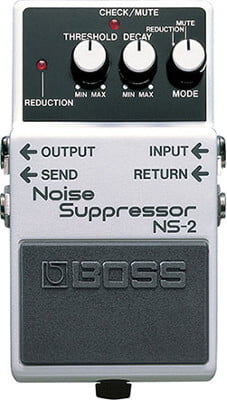
Noise gates like the TC Sentry and Boss NS-2 have two signal paths to them. A signal sense path for your guitar input being the first. But it also has a silence or signal gate path to apply the suppression.
This can be a bit confusing to newer users to a noise gate. Most people assume that the noise gate is clamping the guitar input and the effects loop at the same time. But that is not the case.
If the 4 cable method is used with your noise gate, only the effects loop side of the connection is being silenced.
Your input chain is only the side that is being “sensed” by your noise gate to know when to open or close. When you play your guitar the gate will open and when you stop it will silence or close.
If you are using the Boss NS-2 noise suppressor, for example, you know it has an input, output, send and return. The input and output are the sense side, and the send and return connections are your gate.
4 Cable Method and Multi-effect Units
In the case of multi-effect units, the connection methods are somewhat different. Here is a connection method with diagrams for the more popular devices available today:
Line 6 Helix
If you are connecting your amplifier up to a Line 6 Helix, you will want to hook itup according to the diagram below.
I have made colored lines that signify each of the 4 cables needed to make the connections.
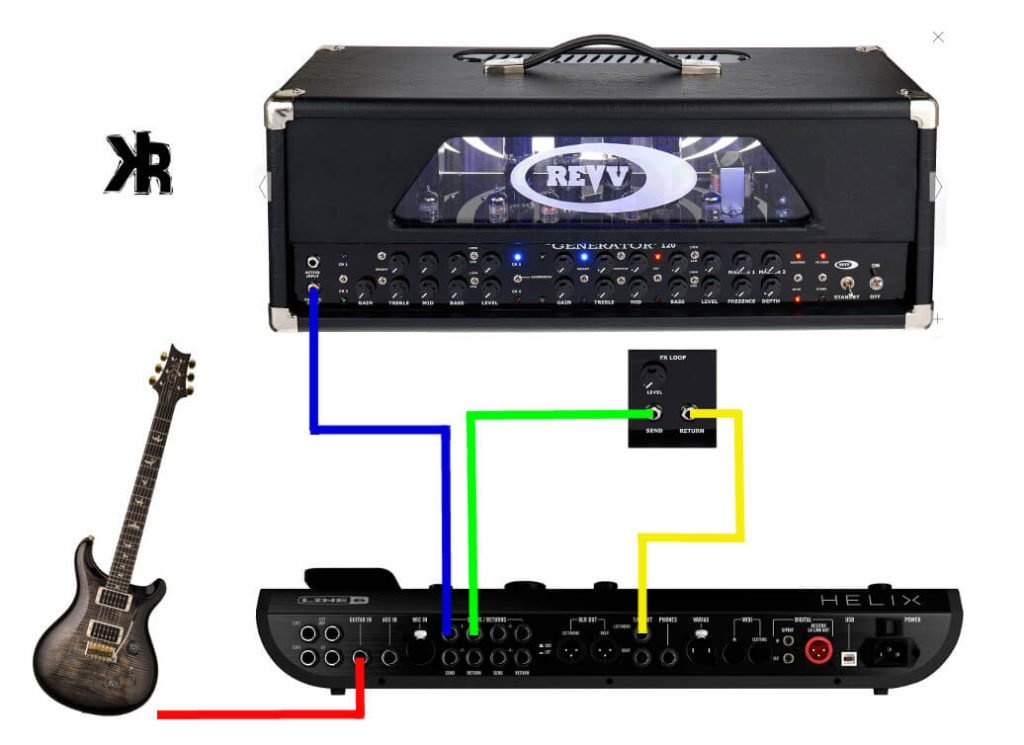
| Cable | Connection |
|---|---|
| Red | Instrument to the GUITAR IN |
| Blue | Amplifier input to #1 Send |
| Green | Amp FX loop Send to #1 Return |
| Yellow | Amp FX loop Return to Output |
Keep in mind that there is still more that needs to be set up to make your gear play nice together and actually work.
You will need to set up the helix to have FX Loop blocks in the signal chain. Both Send and Return will need to be configured. Also, if your amplifier has effects loop level controls, those will need to set as well. This video will help you understand the connections.
Line 6 Pod Go
The Line 6 POD Go can also be used for a 4CM connected rig. This is similar to the Helix, and so the diagram above can be used in the same manner. I have also created a connection instruction below to allow you to hook it up correctly.
Simply connect each of the cables to your amp and the POD Go as listed below, and you will then only need to set up the software. This will allow you to configure the Line 6 POD Go and the effects you want to use.
| Cable | Connection |
|---|---|
| Red | Instrument to the GUITAR IN |
| Blue | Amplifier input to FX Loop Send |
| Green | Amp FX loop Send to Return/Aux |
| Yellow | Amp FX loop Return to Main Out Left/Mono |
Boss GT-100
Use the image below to connect to the Boss GT-100. In this diagram, the FX loop from the amplifier has been made visible for you once again.
There are 4 colored lines that signify each of the cables needed to make the connection to the Boss GT-100.
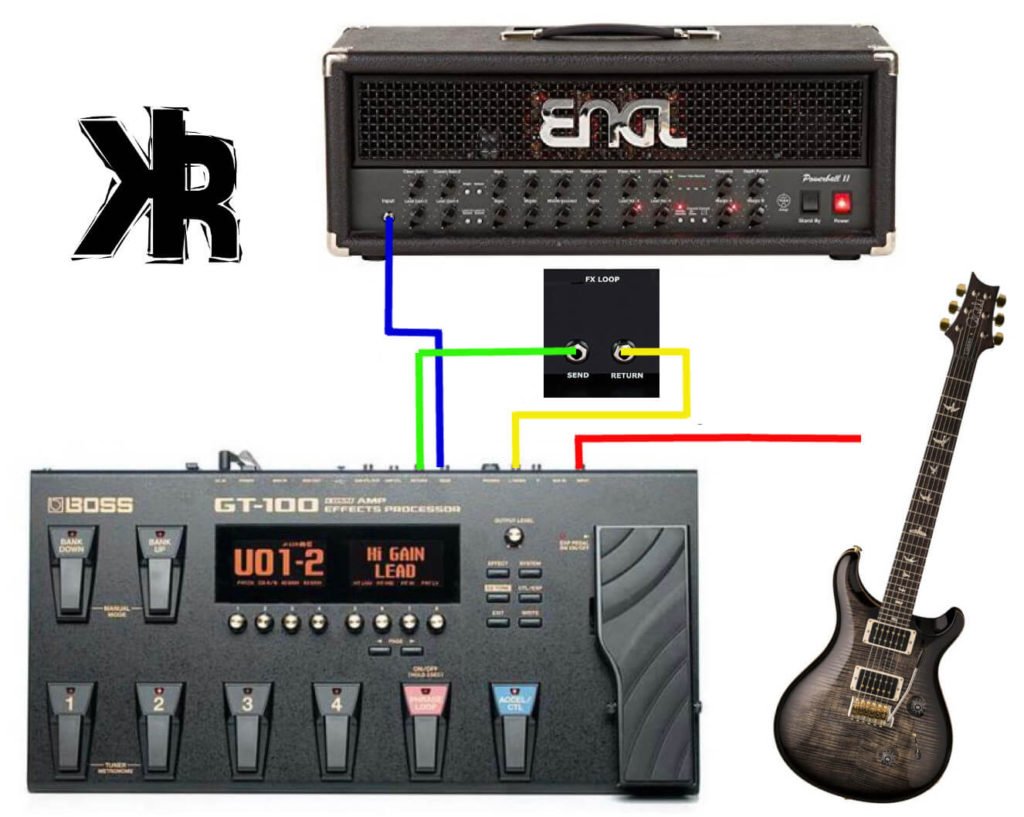
| Cable | Connection |
|---|---|
| Red | Guitar to Input |
| Blue | Amplifier input to Send of EXT loop |
| Green | Amp FX loop Send to Return of Ext Loop |
| Yellow | Amp FX loop Return to L/Mono |
Now, you need to set your GT-100 up in the software to insert the FX Loop block (S/R Block) up to send to your amp.
So make sure that you have an FX Loop block in the patches for this work. Also, if your amplifier has a send or return level control for the loop, those might need to be adjusted as well.
Fractal AX8
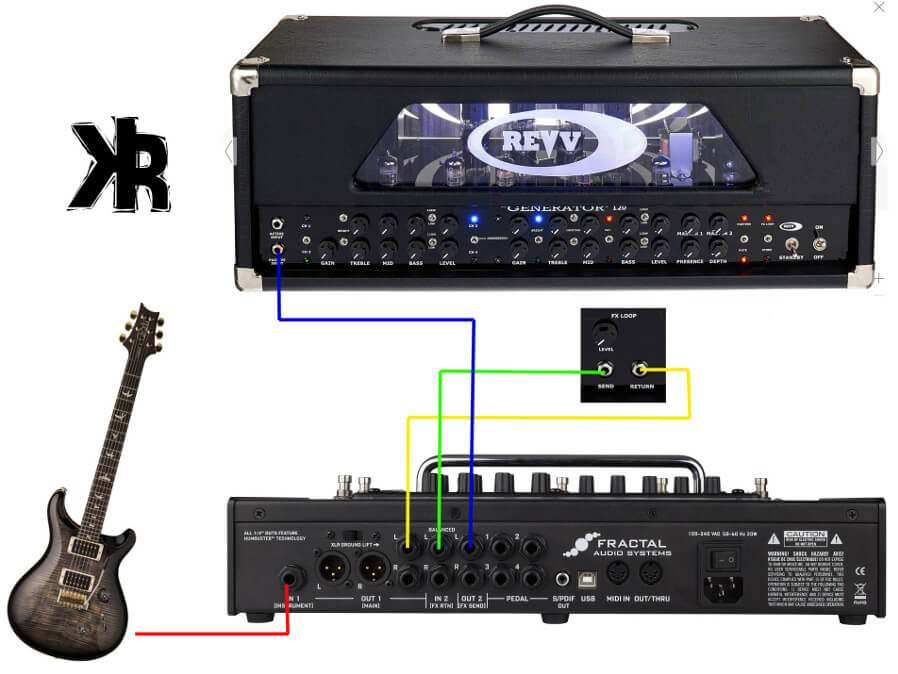
When connecting your amplifier up to a Fractal AX8, the diagram below will help you understand the layout.
There are colored lines that signify each of the cables needed to complete the connections with the Fractal AX8. The provided table will show you where they need connect.
| Cable | Connection |
|---|---|
| Red | Guitar to IN 1 |
| Blue | Amplifier input to OUT 2 L |
| Green | Amp FX loop Send to IN 2 L |
| Yellow | Amp FX loop Return to OUT 1 L |
Once the physical connections are made, set the AX8 up the way you like. But make sure that you are including an FX Loop block in your signal chain.
You will also want to make sure your Out 1 and 2 level controls are turned up close to max. This will get the right signals to the amplifier.
If your amplifier has the effects loop send or return level controls, those need to be adjusted.
Quad Cortex
Connecting your Quad Cortex in 4 cable method is just as easy as the other modelers. Make sure to have good quality cables and connect according to the table below.
| Cable | Connection |
|---|---|
| Red | Guitar to input #1 |
| Blue | Amplifier input to Send #1 |
| Green | Amp FX loop Send to Return #1 |
| Yellow | Amp FX loop Return to Out 3/L |
Once all your connections have been made, it’s now time to set up your signal path with the blocks on the quad cortex. One of the things to keep in mind is that the volume will need to be turned right up on the unit. For block set up, here is a great video to walk you through.
4 Cable Method Tips
Implementing the 4 Cable Method can significantly enhance your guitar tone, but to get the most out of this setup, here are a few tips:
Understand Your Effects
It’s crucial to know which effects sound best before the preamp and which ones perform optimally in the effects loop. For instance, gain pedals like distortions usually sound best before the preamp.
While time-based effects like delay and reverb often sound better in the loop. However, these are not hard and fast rules! The best setup can vary depending on your specific gear and personal preferences.
Experiment with Different Settings
Don’t be afraid to experiment with placing pedals in different parts of the signal chain. While there are general guidelines about pedal order, the best setup is often the one that sounds best to your ears. Try different combinations and listen to the results to find the optimal configuration for your rig.
Leverage Your Multi-effects Pedal’s Preamps
If you’re using a multi-effects unit with modeled preamps, don’t forget to experiment with these as well. You might find that some of these preamps offer a unique tone that complements your amp’s natural sound.
Keep It Simple
While the 4 Cable Method can provide superior sound quality, it can also be more complex and require more cables than a traditional setup. If you’re playing in a situation where simplicity is key, such as a live gig or band practice, it might be more practical to use a simpler setup.
Conclusion
So as you can see, the 4 cable method can be a real benefit! The improved sound quality from effects can be a real game changer.
It can also allow you to switch between amp, pedal, and modeler preamps. This adds some great versatility! But it does come at the expense of a more complicated setup and potential noise issues.
Luckily enough, for those that want to make it work, there are solutions for all of it, and I would encourage you to try it!
I would also like to encourage you to try effects in different slots on your board or in your processor. Sometimes finding great tone lies in where your effects are placed in your chain!
Frequently Asked Questions
Can I Use the 4 Cable Method with Any Amplifier?
The 4 Cable Method requires an amplifier that has an effects loop, specifically with “Send” and “Return” jacks.
If your amplifier doesn’t have these features, you won’t be able to utilize this method. It’s crucial to check your amplifier’s specifications before attempting the setup.
What Are the Best Cables to Use?
The quality of the cables you use can significantly impact your sound. It’s advisable to use shielded, high-quality cables to minimize any potential noise or signal loss.
Additionally, the length of the cables should be kept as short as possible to prevent any degradation of the signal.
Do I Need Special Pedals for This Method?
You don’t necessarily need special pedals to use the 4 Cable Method. The setup is designed to work with your existing pedals.
The advantage is that it allows you to use both your preamp effects like overdrive and distortion, as well as time-based effects like reverb and delay, in a more effective manner.
Will This Setup Work for Bass Guitar?
The 4 Cable Method can also be applied to bass guitar setups. The basic principles remain the same, although you may need to adjust specific pedals and amplifier settings to accommodate the different frequency range of a bass guitar.