Table of Contents
Learning how to connect effects pedals to an amplifier is a crucial process for musicians seeking to enhance their sound. This Killer Rig article provides a comprehensive guide on how to seamlessly connect effects pedals to an amp, ensuring optimal performance and sound quality.
Effects pedals have evolved significantly over the years. Especially with advancements in technology and the increasing demand for customized sound effects.
As a result, understanding how to connect them has become an essential skill. Especially for any musician looking to elevate their performance and unlock noise-free sound.
If you are not sure how to use pedals at all, read this article first: How to use guitar effect pedals.
Understanding the Basics of Connecting Pedals
To connect effects to an amp, it is essential to understand the basics of pedal connection. Here are the 3 main points to help you navigate the process smoothly:
- Choose the Right Cables: Use high-quality cables with appropriate connectors to ensure reliable signal flow between your pedals and amp. Invest in shielded cables to minimize noise interference.
- Signal Chain Placement: Arrange your pedals in a specific order, known as the signal chain, to achieve the desired sound. Generally, the signal flow starts with the guitar, followed by distortion, modulation, and time-based effects, and ends with the amp.
- Power Supply Considerations: Use a power supply unit (PSU) to provide consistent and clean power to your pedals. Daisy-chain cables may introduce unwanted noise, so a dedicated PSU is ideal. Consider the power requirements of your pedals and choose a PSU that can handle the combined load.
Now, when connecting an effects pedal to your amplifier, there are two ways of doing this. The first technique involves connecting everything to the front of the amp. The second technique involved using the effects loop.
This article will be focusing on the front of amp method to keep things simple. This is a very effective technique when the amplifier is set to clean and is only a pedal platform. If you want to get more advanced, read my article: how to use an effects loop.
When connecting your pedal to the front of your amplifier, you will need 2 cables. The first one goes from your guitar to the input on the effect pedal. The second one goes from the pedal output to the amplifier’s input. Here is an image to help you understand what it looks like:
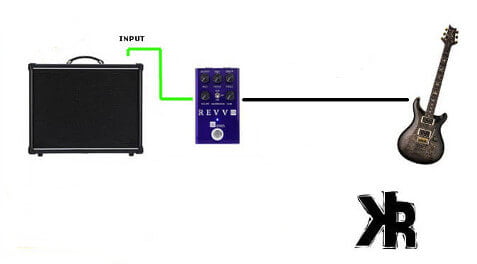
As you can see in the image above, I have connected a Revv G3 distortion to a clean amplifier. This will allow me to get a great metal tone from the pedal.
If you have yours connected the same way, but are experiencing issues, and are using high quality cables and power supplies, keep these additional points in mind:
- Ground Isolation: Some pedals, particularly old or poorly designed ones, may introduce ground loop issues. Consider using ground loop isolators to eliminate any unwanted hum or buzzing sounds.
- Buffering: If you have a large number of devices in your signal chain, using a buffered pedal can help maintain the signal strength and prevent tone loss caused by long cable runs.
- Pedal Order Experimentation: While there are general guidelines for arranging pedals, don’t be afraid to experiment with different orderings to find your desired sound. Each pedal’s placement can affect the overall tone and feel.
By understanding the basics of connecting pedals, you can optimize your setup and achieve the desired sound quality.
Related: How to use the 4 cable method.
Connecting Multiple Pedals Together
When connecting multiple pedals together, things can get pretty complicated. Each pedal will influence the way another will perform. So you need to know how to create a proper signal flow for best results. To connect pedals together effectively, follow these steps:
- Prioritize your pedals: Determine the order in which you want your pedals to be connected. This order will affect the overall sound and impact of your effects. Start with the pedal that influences your core tone, such as an overdrive or distortion, and then proceed to modulation, time-based, and other effects.
- Connect your pedals: Use audio patch cables to connect your pedals in the desired order. Start by plugging the output of one pedal into the input of the next. Be mindful of the input and output jacks on each pedal and ensure the correct connections. Avoid using excessively long cables to maintain signal integrity.
- Power your pedal chain: Provide power to each pedal in your chain. Most pedals use a standard 9V power supply or battery. Use a reliable source that can accommodate the total power requirements of your pedals. Daisy-chaining power supplies can introduce unwanted noise, so consider using individual sources or a dedicated multi-pedal supply.
To ensure optimal performance, it’s crucial to follow these steps when creating a pedal chain. By prioritizing and connecting the pedals correctly and providing adequate power, you can achieve the desired effects seamlessly.
Remember to experiment with different pedal combinations and their order to find the sound that suits your style and preferences best. Just remember that time based, and modulation effects can get chewed up if they go before a distortion. Always keep them after any pedal that distorts.
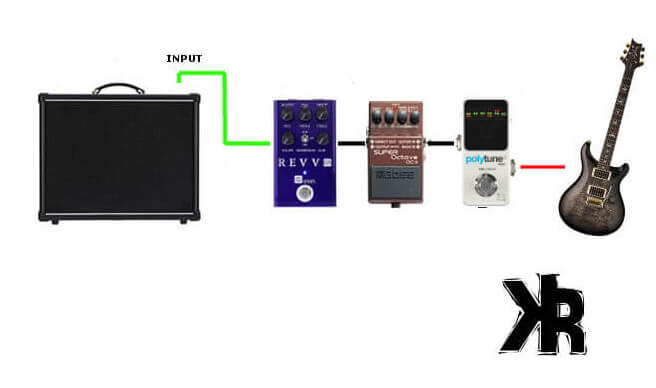
In the image below, you can see multiple pedals connected together. They are connected to the input of the amplifier in an order that will not negatively affect the performance of the other pedals.
Note: Each pedal brand and model may have specific requirements or recommended order, so it’s essential to consult the user manual or manufacturer’s guidelines for any unique details regarding your pedals.
For optimal results, try to keep cables tidy and organized, minimizing potential interference. Additionally, consider using high-quality cables and making sure all connections are secure.
Creating a well-structured pedal chain can greatly enhance your playing experience and allow you to explore various tones and effects. Take the time to experiment and fine-tune your setup to unlock a world of sonic possibilities.
Powering Your Pedals

Many guitarists neglect to supply their pedals with the proper power. This always leads to poor performance or noise. So I want to stress that you should take this seriously. To power your pedals effectively, follow these steps:
- Use a suitable power supply: Ensure that your power supply meets the voltage and current requirements of your pedals. Using a dedicated power supply can help avoid noise and interference.
- Connect power cables correctly: Use the appropriate cables to connect your power supply to each pedal. Pay attention to the polarity of the connectors and use reverse polarity protection if available.
- Daisy chain multiple pedals: If you have multiple pedals, you can daisy chain them using a power adapter with multiple outputs. However, be mindful of the overall power draw and potential noise issues that may arise.
- Consider isolated power sources: For pedals that are sensitive to noise or interference, using isolated sources for each one can provide cleaner and more reliable power.
- Use pedal-specific power options: Some pedals require specific power options, such as battery or specialized supplies. Refer to the manufacturer’s instructions or specifications for these pedals.
- Test for noise and grounding issues: After powering your pedals, listen for any noise or hum issues. If you encounter problems, check the grounding of your pedals and power supply, and consider using noise reduction solutions if necessary.
In addition, make sure to label your power supply cables and keep track of the requirements for each of your pedals. By powering them properly, you can ensure optimum performance and avoid potential issues.
Related: Best guitar pedal power supplies.
Exploring Pedal Boards
A pedal board is an essential tool for a guitarist using multiple effects. And so if you are planning to use a lot of them, then you really should do yourself a favor and consider a board. It’s designed to hold and organize these pedals, providing a structured way to connect them to an amplifier.
One of the main benefits of using a pedal board is the organization. Without it, a guitarist might deal with a clutter of cables and pedals scattered around. A dedicated board neatly arranges them, providing a systematic approach to managing various effects.
Furthermore, a pedal board provides protection for each device, cables and even the power supply. By housing them in one compact area, the risk of damage from moving or stepping on individual pedals is reduced. The pedals are secured, offering longevity and consistent performance.
Additionally, the pedal board makes transportation and setup simpler. By having all the pedals attached to a single board, a guitarist can move and set up the equipment more efficiently. This convenience is especially valuable for musicians who frequently perform at different venues.
Optimizing Your Pedal Order
Optimizing your pedal order is crucial for achieving professional sound quality. Follow this 4-step guide to ensure the perfect arrangement of your effects pedals:
- Identify the purpose of each pedal: Evaluate the characteristics and capabilities of each pedal in your setup. Consider their impact on tone, dynamics, and signal flow.
- Arrange based on signal flow: Begin with the ones that modify the pure guitar signal, such as compressors or volume pedals. Follow with gain-based effects like overdrive or distortion. Then, modulation effects like chorus or phaser. Finally, time-based effects like delay or reverb.
- Consider interaction between pedals: Experiment with different combinations and orders to find the best interaction between pedals. Listen for any unwanted signal degradation or loss of clarity. Make subtle adjustments to find optimal results.
- Test and refine: Once you have found the right pedal order, test it in the context of your overall sound. Make necessary adjustments to fine-tune it and ensure that all pedals work well together.
It’s important to keep in mind that there is no one-size-fits-all approach to optimizing your pedal order. It’s a process that is pretty much specific to you. To find the combination that best fits your style and desired tone, trust your ears and continue to experiment.
Conclusion
Mastering the art of connecting effects pedals to an amplifier is a journey that takes time, patience, and a touch of experimentation.
From selecting the right cables and understanding the signal chain to optimizing pedal order and exploring the benefits of a proper board, there’s a world of possibilities waiting to be explored.
Technical knowledge, along with a willingness to experiment and explore, are all necessary steps on the path to developing your exclusive sound signature.
Understanding how to connect your pedals is the first step in creating anything from a precise, noise-free sound to a combination of refined tones.
FAQs
Do I need any additional cables to connect multiple effects pedals?
If you have multiple effects pedals that need to be connected at the same time, you will need patch cables.
These small cables are designed to connect your guitar pedals to one another, allowing you to create a chain. Connect the first pedal to your guitar as usual, and the last one to your amp. Then connect the pedals in order using the patch cables.
What power supply options do I have for my pedals?
In order to power your pedals, you have three main options: 9V battery, DC daisy chain, or an isolated power supply.
Most full-size pedals can be powered by a 9V battery. While mini pedals usually require a mains connection. You can use an adapter plug for the mains connection or use a power supply with multiple outputs to power multiple pedals simultaneously.
How do I choose the right pedal board size?
When choosing a board, consider the number of pedals you currently own and whether you plan to add more in the future.
Add a couple of extra slots for future expansion. Also, think about whether you need a power supply or not. Look for a pedal board that can accommodate them comfortably and provides the necessary power supply options.